Flourless Chocolate Cake (gluten free)

It was our anniversary last week. We celebrated as many middle- age-couples-with-kids do. Staying home, ordering take away and falling asleep in front of a movie. Yep, party animals, I know!

I often find myself in a reflective mood on days like anniversaries, and this day was no different. As I went about my day, with the highs and lows of the last 16 years swirling through my head, I came up with 16 lessons that the last 16 years have taught me. 

I wrote them down with the intention of sharing them with you, but that was before the argument that turned into a fight. 

I was quick to toss the list aside. 

I can’t write about marriage when we are just cooling off from our last argument? What qualifies me to share lessons from our journey? 

And then it was the conversation with a kindred spirit that had me mulling over what qualifies any of us to write and share anything at all. 

If perfection is required to share thoughts on parenting, marriage, cooking, or faith, then I really need to make this my last ever blog post and say farewell to you all. 

The truth is I, like all people who write about stuff, have it no more together or perfect than those who don’t write.

I suppose the only difference is I am willing to share the good and the not so good stuff of life through what I write.

So here they are, lessons learnt through the imperfection of the journey. Lessons we keep learning today. 

16 Lessons from 16 Years of Marriage

  1. I love him more now than 16 years ago.
  2. It’s harder than I expected.
  3. It’s a marathon, not a sprint.
  4. My husband always seems to offer the olive branch first. He shows grace and moves on quickly. I’m still working on this. 
  5. It’s ok that we are different. I’m good in the morning, he holds it together at night. I can cook, he can build the boys a billy cart. I freak out about a potential disaster, he stays calm. He can drive all day, I negotiate peace amongst the kids in the car. Different means we’re a good team, even if it makes for interesting sometimes. 
  6. We’ve grown to be the same over the years too. I love the rugby and he now knows how to book a good restaurant and sit with me for hours talking over a meal. 
  7. You don’t always needs to talk. It’s ok to sit in silence. It doesn’t always mean something is wrong. 
  8. Communication is essential. Say it. Get it out. Deal with it. Move on. Unresolved issues not spoken of will fester, bubbling under the surface and eventually rot the foundations. 
  9. We can agree to disagree on things that don’t matter. Bedtimes, clothes, job lists, holiday destinations can all be negotiated. But family, it’s direction, goals, beliefs, parenting, use of time and money – we need to be on the same page on the big things.
  10. We need to compromise with no strings attached. 
  11. Small random acts of kindness on a daily basis, like making a cuppa, calling during a busy day to see how an appointment went, offering to do something helpful, will show love sometimes more than the once off, BIG, FLASHY things.
  12. Time alone without the kids is essential.
  13. Laugh. Hold Hands. Dance in the kitchen. Life is going to get harder, so fight for joy when you can. 
  14. Give each other time to do the things they love. He has sent me to cooking classes over the years, I’ve encouraged him to cycle with his mates. 
  15. Invest in mutual friends who we can be real with. They’ll see the good, the bad and the ugly and they’ll still be a safe place for us both.
  16. Keep our eyes on Jesus. He was the ultimate example of sacrificial love, grace, forgiveness and putting others first. We’re going to need all those things to make it to the finish line together. 
Flourless Chocolate Cake
Serves 12
A rich, moist, chocolate cake made with roasted pecans and a hint of brandy.
Write a review
Print
Prep Time
20 min
Cook Time
40 min
Total Time
1 hr
Prep Time
20 min
Cook Time
40 min
Total Time
1 hr
Ingredients
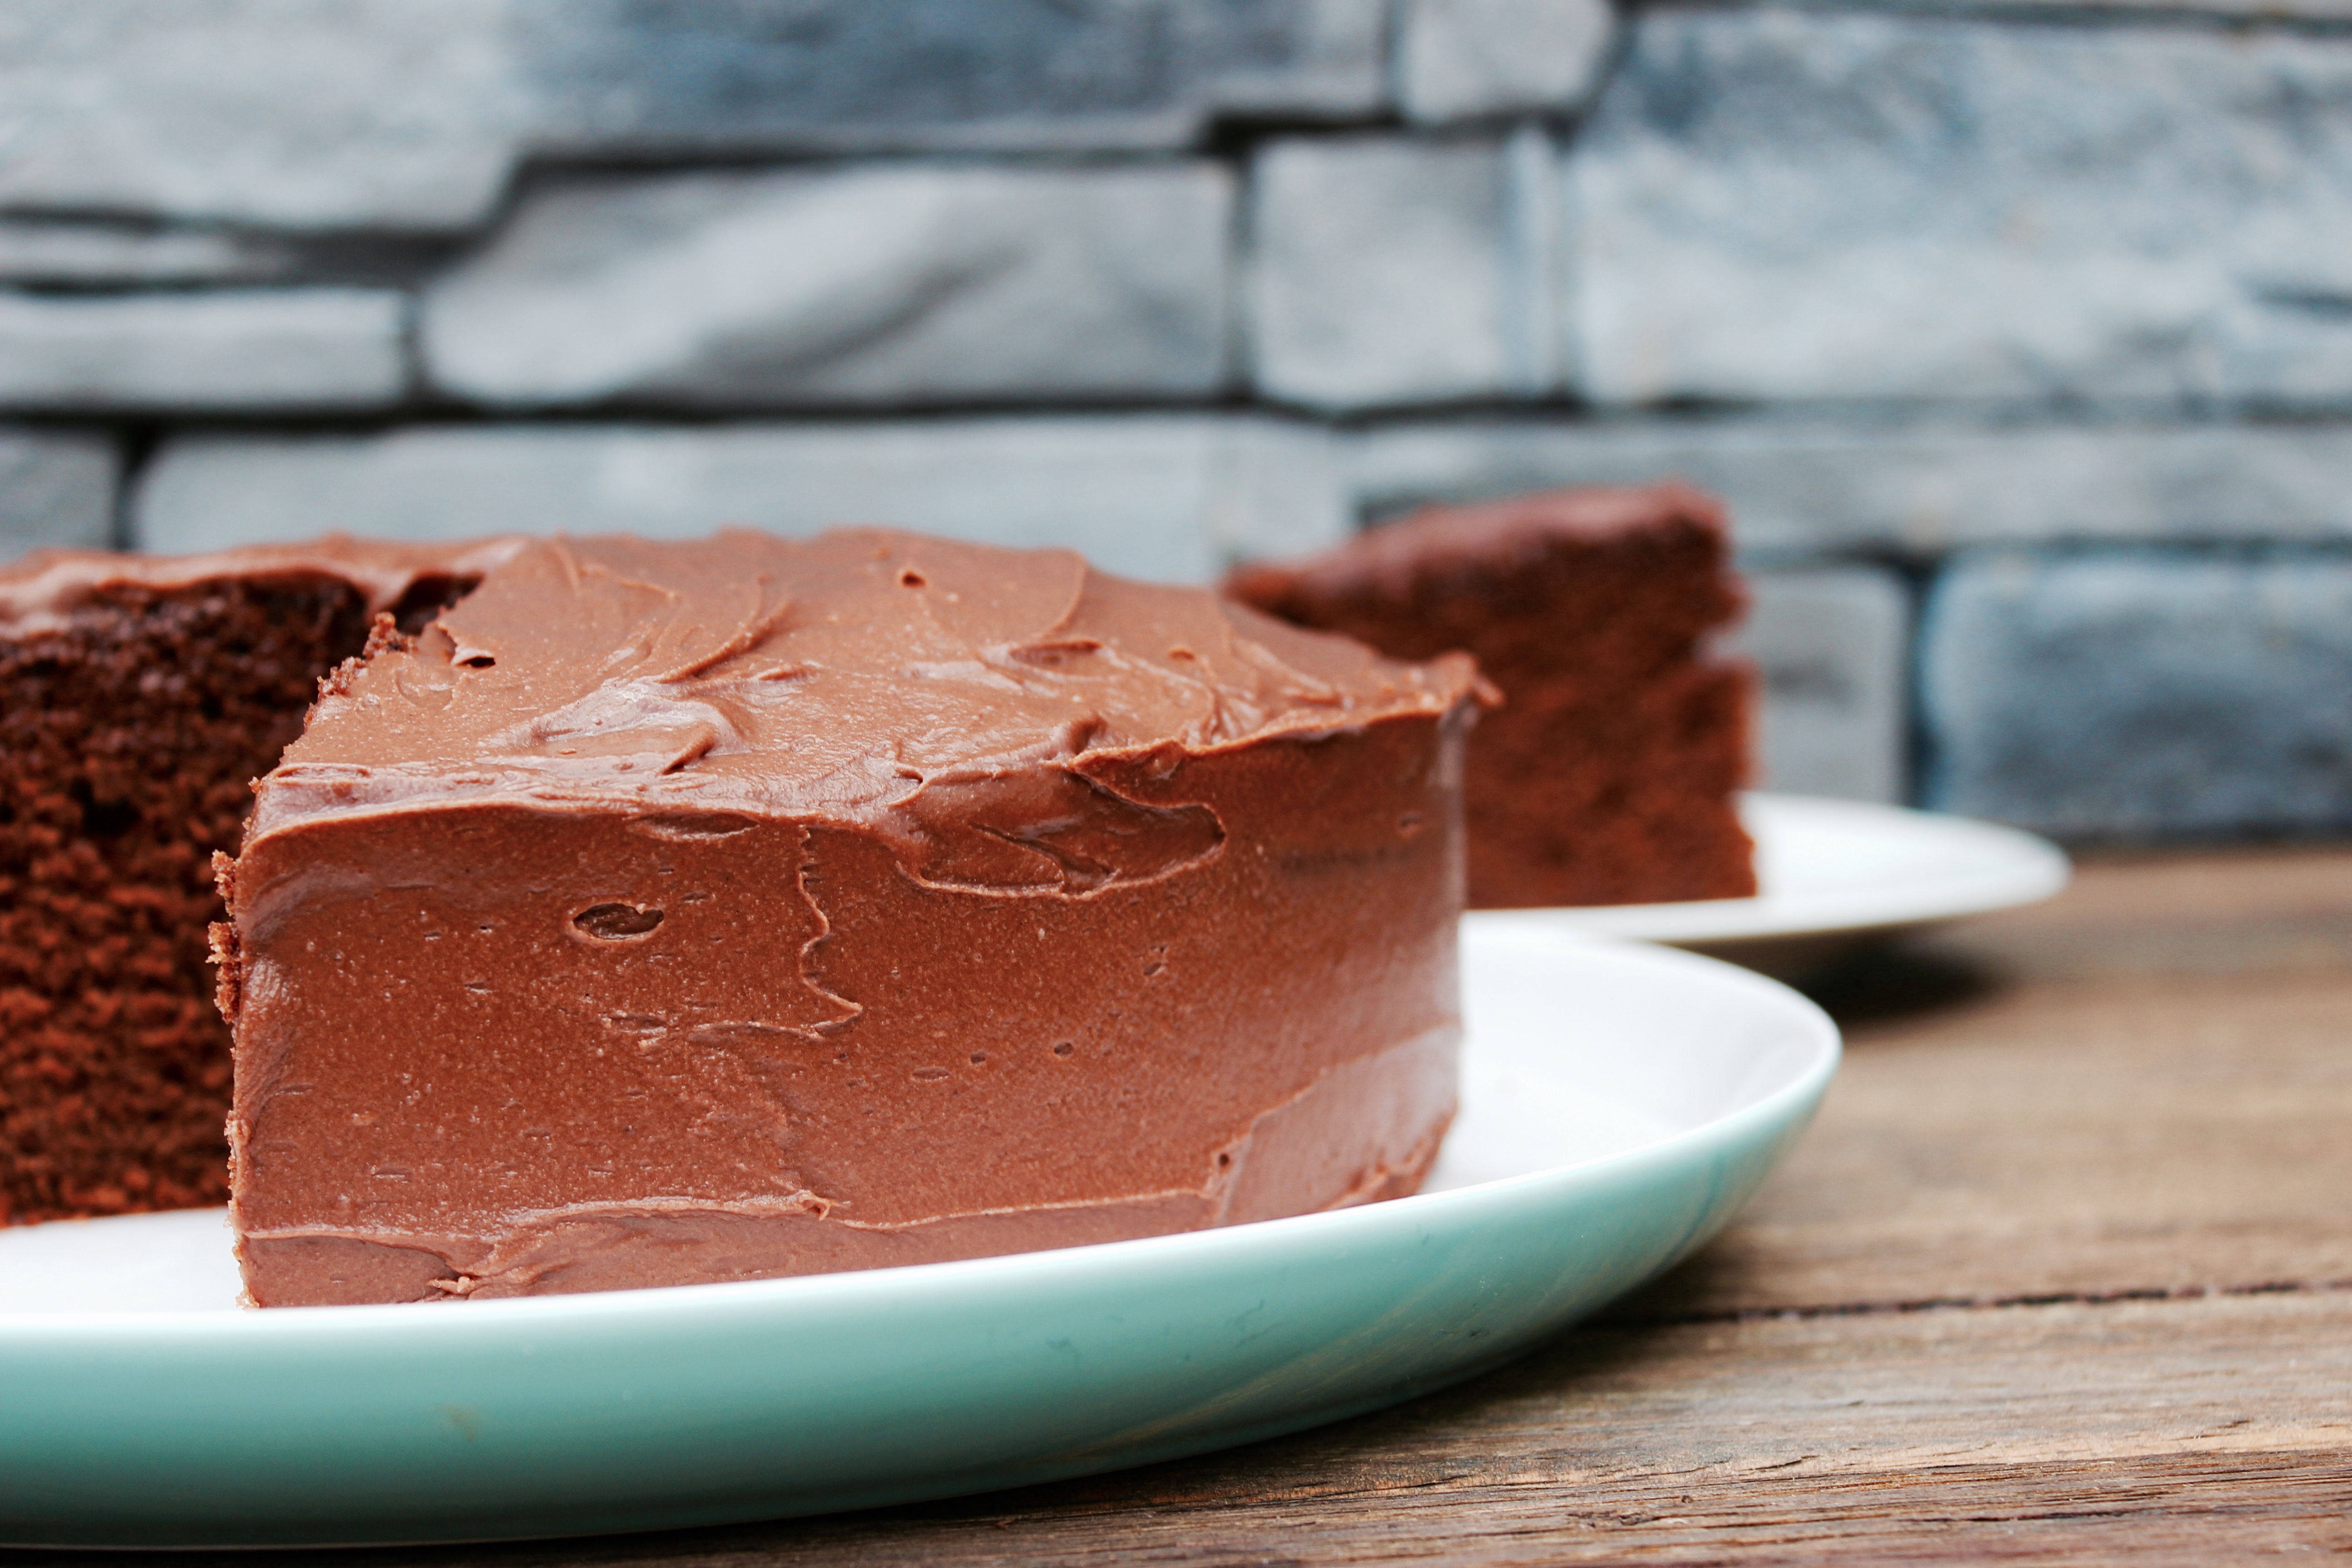
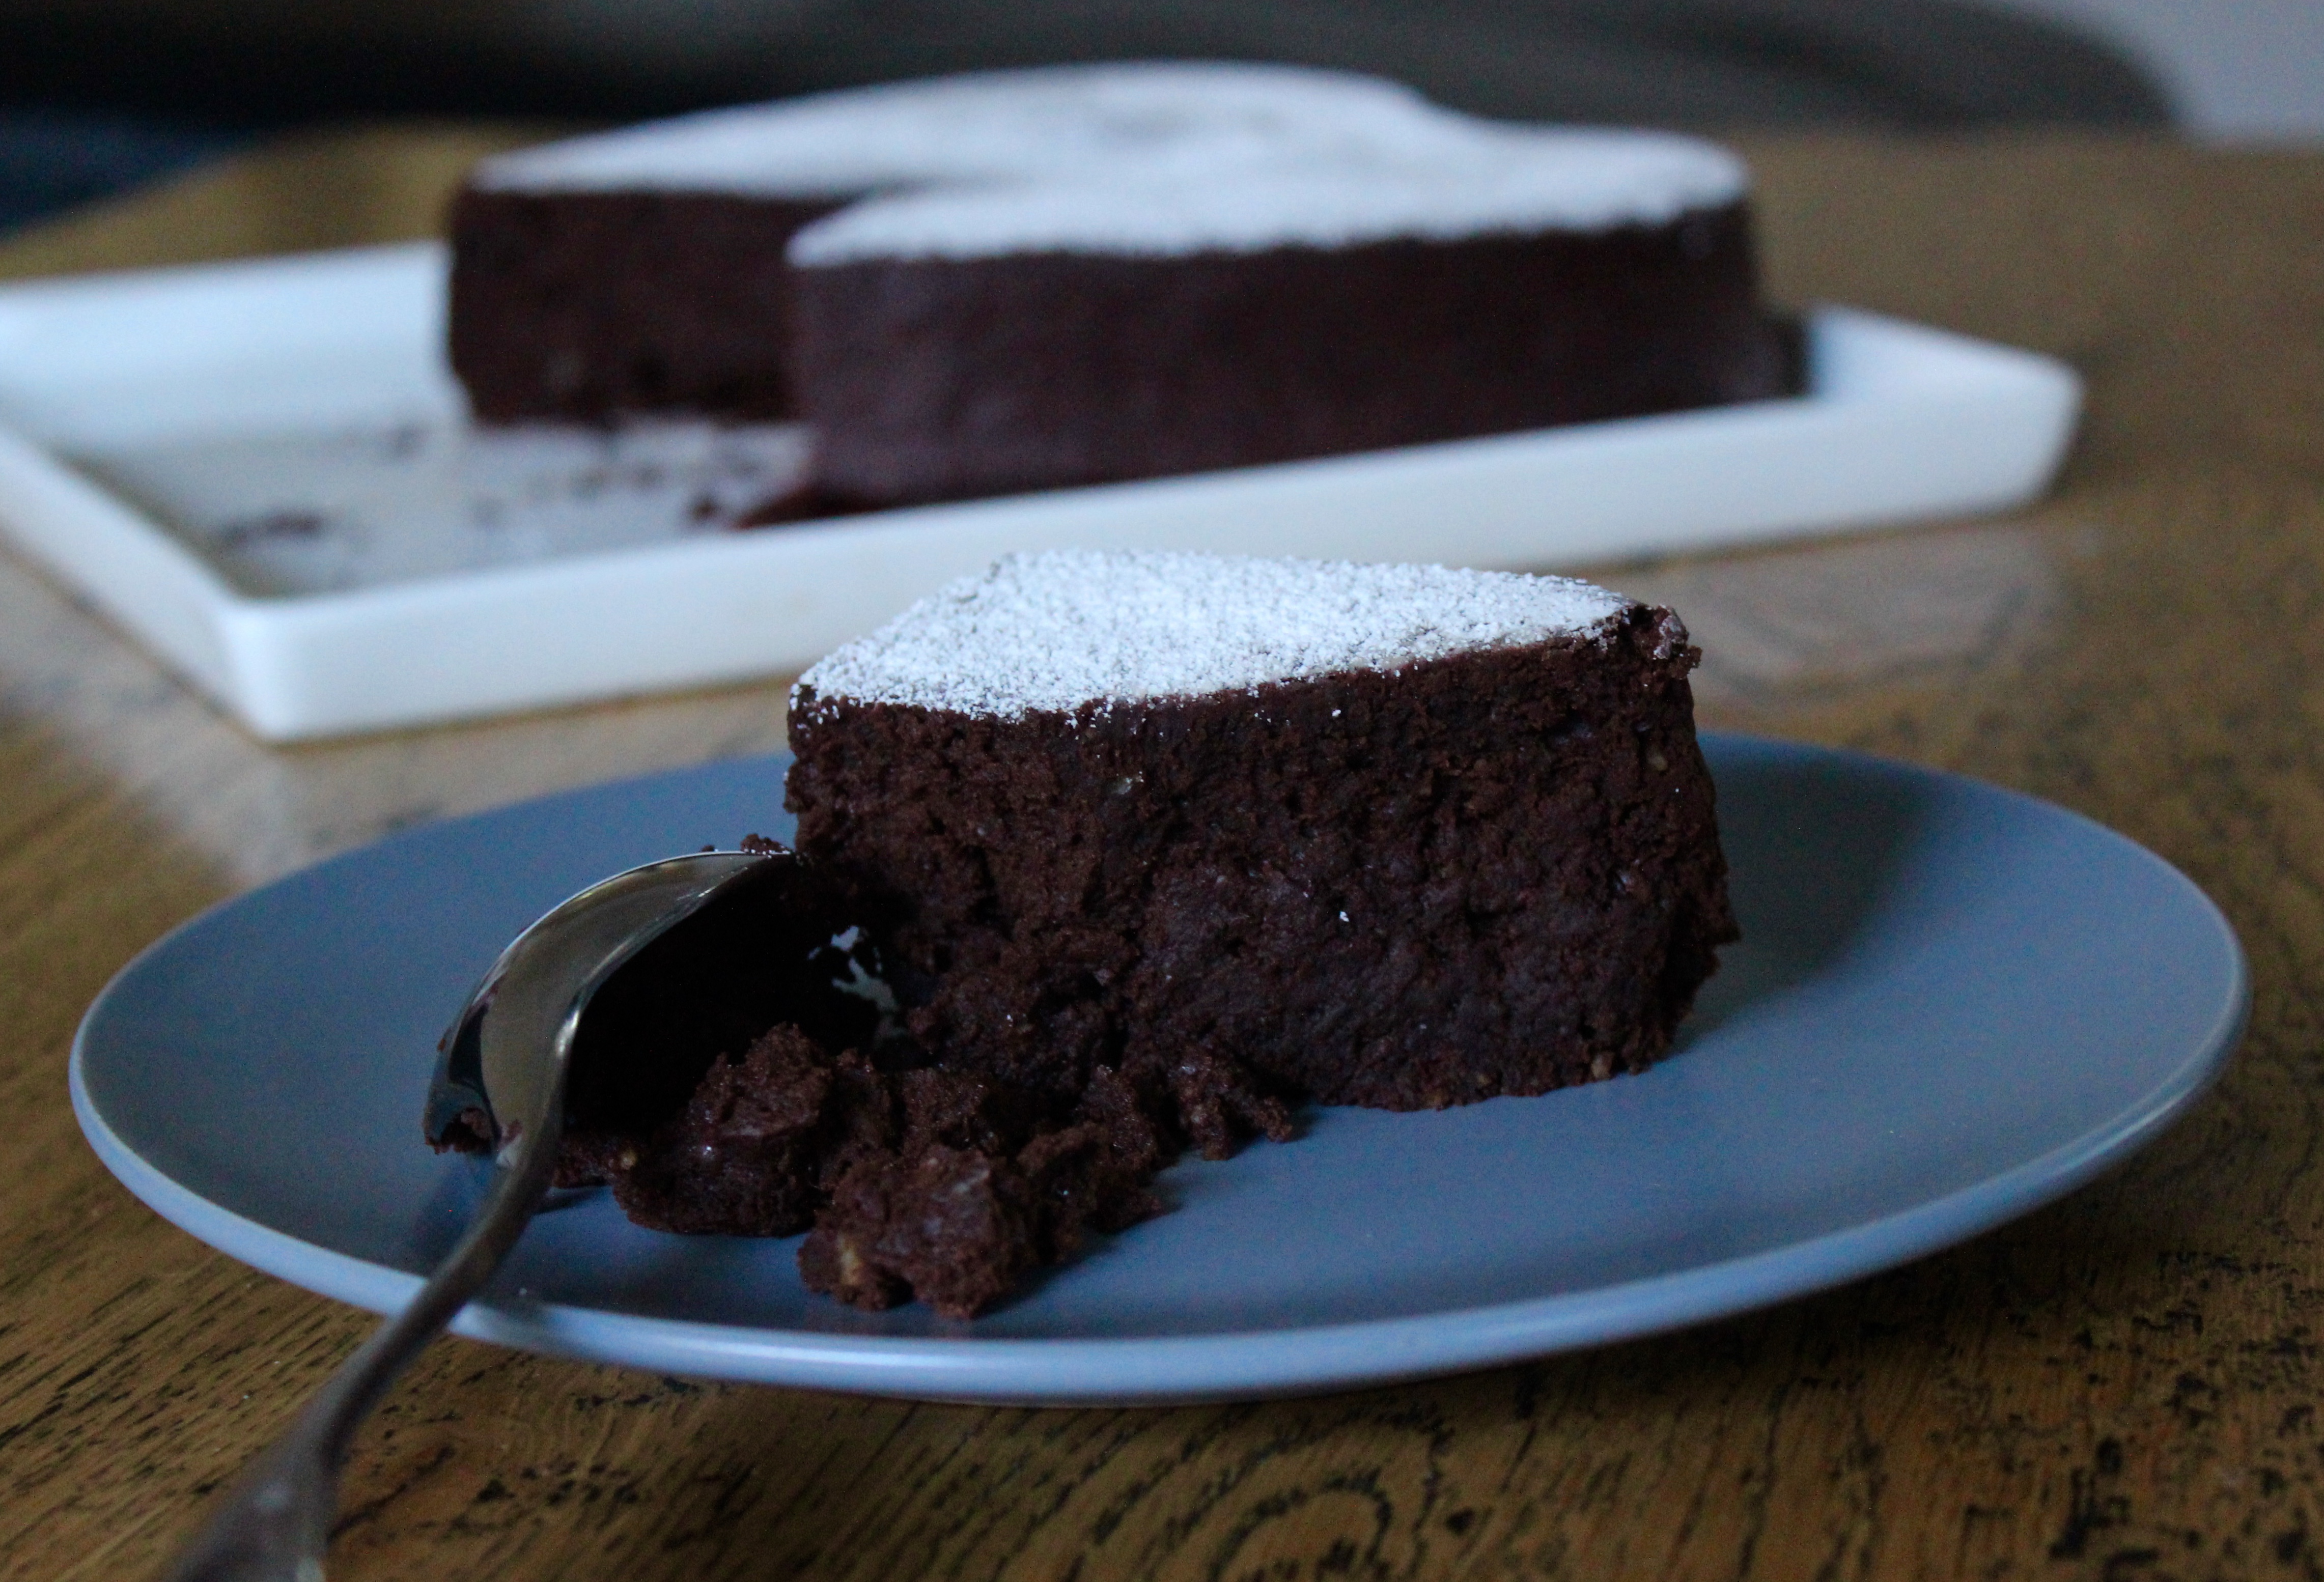
  1. 250 grams unsalted butter
  2. 250 grams good quality dark chocolate
  3. 85 grams sifted cocoa powder
  4. 180 grams pecans, roasted
  5. 6 eggs
  6. 1 cup castor sugar
  7. 1/3 cup brandy
  8. 2 teaspoons vanilla
  9. icing sugar for dusting
Instructions
  1. Preheat oven to 180 degrees celsius.
  2. Grease and line the base and sides of a 20-22cm round cake tin with baking paper.
  3. Melt the butter in a saucepan over a medium heat.
  4. Add the broken chocolate and whisk until melted too.
  5. Take the pan off the heat and whisk in the cocoa, till smooth and glossy.
  6. Set aside to cool a little.
  7. Whiz the pecans in a food processor till they are as fine as possible, being careful to stop before they turn into a paste.
  8. Set aside.
  9. In a large bowl, whisk the eggs and sugar together with a hand balloon whisk till combined.
  10. Whisk in the chocolate mixture, then the brandy and vanilla.
  11. Stir in the ground pecans.
  12. Pour the batter into the prepared tin and bake for 40 minutes. The middle of the cake may still wobble a little, but if the sides are set, it is ready.
  13. Cool completely in the tin.
  14. Remove from tin and dust with icing sugar to serve.
  15. Serve warm or at room temperature with thick cream, ice-cream and berries for a special dessert.
Notes
  1. This cake will last for one week covered in the fridge.
Adapted from Mix and Bake
cook fast eat slow https://www.cookfasteatslow.com/


Apple and Almond Cake (gluten free, dairy free)

These school holidays came and went in a whirlwind of park visits, skateboarding, basketball, soccer, play dates, bush walks, camp fires and bike rides.

It is my pleasure and joy to be raising three gorgeous humans who need enormous amounts of physical activity each day. It’s like constantly moving is their oxygen and absolutely essential for their survival. 

I am a slow learner, however, and always start off school holidays in the exact same, girly way.

“Boys, lets stay in today. Let’s have a PJ day, watch movies, play with toys, sip hot drinks and catch up on how each other is going. It’s been such a busy term, let’s just go slow today.”

This works NEVER.

And I am declaring it publicly so that you will remind me before the next holidays roll around NOT TO DO THIS AGAIN.

By 9.30am on Day 1 of holidays, I have ordered all cushions back on lounges instead of being used as weapons, I have yelled things like “please get off your brothers head/please take the ball outside/please stop yelling at each other/the house is not a gymnasium/get that skateboard outside/no, you cannot have WIFI yet/you can’t shoot water guns inside/stop swinging on the chair/I asked you to get off your brothers head.”

And then, we all get promptly dressed, pack the car with bikes, skateboards, RC cars, basketballs and soccer balls and head to the park. 

Peace at last. 

After a couple of days we did get into our holiday rhythm and enjoyed time with extended family and friends amongst many activities.

As exhausted as I am at trying to keep up with them during holiday time, I realise these years with our boys are precious as we make memories and experience stuff together. I know I will look back on them with fondness, remembering the time spent together more than how tired I felt. I hope so anyway.

One of our favourite days was spent with friends picking apples at an orchard. I felt like a real country bumpkin in my cowgirl boots, carrying my red bag and filling it with all types of apples, while recipe ideas swam through my head. Meanwhile the boys ran, climbed the trees to get the best apples, jumped on tractors, ran some more and picked as many apples as they could.

11 kilos in total.

Yes folks, this is the first of a few recipes coming your way with apples as the star ingredient. 

I think Apple Picking may indeed become an Autumn school holiday tradition in our house. 

This very simple, one bowl cake from the Healthy Chef, Teresa Cutter, has minimal ingredients and is a moist, almost friand-like cake. It’s beautiful warm, and if you can have dairy, served with cream or custard.

As school went back today, I thoroughly enjoyed making it, eating it slowly, still warm from the oven and then opening my computer and writing about it. And I did all of that without uttering one word. 

I feel better already. 

IMG_8404


Apple and Almond Cake (dairy free and gluten free)
Serves 8
An apple and almond, friand-like cake, with a hint of orange and honey.
Write a review
Print
Prep Time
10 min
Cook Time
50 min
Total Time
1 hr
Prep Time
10 min
Cook Time
50 min
Total Time
1 hr
Ingredients
  1. 2 cups (200 grams) almond meal, (or hazelnut meal)
  2. 1 teaspoon baking powder, gluten free
  3. 1/4 cup light olive oil
  4. 1/4 cup honey
  5. zest of 1 orange
  6. 2 eggs
  7. 1 teaspoon vanilla extract or paste
  8. 1 large apple, peeled, cored and finely diced
  9. flaked almonds to garnish
Instructions
  1. Preheat oven to 160 degrees celsius.
  2. Line a 16cm or 20cm round baking tin with baking paper, on the bottom and sides.
  3. Combine almond meal, baking powder, oil, honey, eggs, zest and vanilla in a mixing bowl and stir to thoroughly combine.
  4. Fold in the apple.
  5. Press into the tin and scatter with a handful of flaked almonds.
  6. Bake for approx 50 minutes, or until golden and the middle springs back when pressed lightly.
  7. Let stand in the tin for 30 mins to cool.
  8. Enjoy warm or at room temperature.
Adapted from The Healthy Chef
cook fast eat slow https://www.cookfasteatslow.com/

Bung-In Chocolate Cake (To Love and Feed Them)

It has occurred to me that when it comes to raising children, nothing can actually prepare you for each new season.

I don’t like this.

If at all possible, I would prefer 12 months notice on All Issues That Will Arise with each of my children. Then I could plan, research, study, hold focus groups and interrogate All Those Who Have Gone Before and demand their wisdom and insights. I could search for the people who have experienced the exact same thing that my kids will and ask them “What do I do?”

But alas no. Reality is more like at 9.45pm at night or as we are running out the door to school late, again, BAM, I’m blind-sided by New Issue that I am totally unprepared for.

I don’t think this feeling of being unprepared is specific to any one season. Whether it’s trying to feed a new baby, or help them learn to sleep, or navigate relationships and technology with teenagers, it’s almost impossible to prepare for how it will look for your kids and your family.

I don’t like this. As I previously mentioned.

So, as I often tell my kids, I am learning to embrace the things I Don’t Like and work out how to get through anyway.

It’s looking a lot more like thinking on your feet, getting it wrong, getting it right the next time, rolling with the punches, counting to 10, walking away, keeping my mouth shut, smiling in front of them and crying once they’re in bed, pretending I’m an expert in said issue while inwardly hoping they can’t see through me, telling them I don’t have all the answers, letting things that don’t matter go, going to sleep thankful a bad day is over and waking up thankful each new day starts with new grace and mercies for myself and for my kids.

Recently I did receive a beautiful text message from One Who Has Gone Before, who has/is raising boys older than mine. Not only is she surviving, but she seems to be doing it with bucket loads of grace and humor. I want to be just like her.

On a particularly discouraging day, as we had started to navigate the tween and teen years, she sent me this advice. Simple but Gold.

1. Keep a sense of humour.
2. Don’t take them too seriously, or take their “moods” personally.
3. Give them space and independence when you can.
4. Encourage good friendships.
5. Above all, keep loving them (NOT always easy)
6. Never stop praying.

I have considered getting it written on a canvas and placing it somewhere I can see it each morning.

And on the days when I seriously don’t know what to do, I try and focus on what I can do.

Love them and Feed them.

Sometimes that has to be enough.

Kate Bracks Bung-In Chocolate Cake
Serves 10
an easy one bowl plain, moist and fluffy chocolate cake.
Write a review
Print
Prep Time
30 min
Cook Time
40 min
Total Time
1 hr 10 min
Prep Time
30 min
Cook Time
40 min
Total Time
1 hr 10 min
Ingredients
  1. 2 cups self raising flour
  2. 1 cup caster sugar
  3. 1/3 cup cocoa powder
  4. 2 eggs, lightly beaten
  5. 2 teaspoon vanilla extract
  6. 1 1/3 cups milk
  7. 150 grams butter, melted
  8. Icing
  9. 1 1/4 cups icing sugar mixure
  10. 2 tablespoons cocoa powder
  11. 30 grams butter, melted
  12. 1 teaspoon vanilla extract
  13. 2 tablespoons milk
Instructions
  1. Preheat the oven to 180 degrees celsius.
  2. Grease a 20cm round cake tin with baking paper, on the base and sides.
  3. Place all the dry ingredients in a mixing bowl and whisk with a hand balloon whisk to combine (this replaces having to sift all the ingredients)
  4. Make a well in the centre, and add the wet ingredients.
  5. Whisk gently until the mixture is smooth and combined.
  6. Pour the mixture into the cake tin and bake for 40-50 minutes or until a skewer inserted into the cake comes out clean.
  7. Cool into the tin for 10 minutes and then turn onto a wire rack to cool completely.
  8. To make the icing, sift the icing sugar and cocoa powder together in a small bowl.
  9. Add the melted butter and vanilla and enough milk to get it to a smooth, spreadable consistency. Add more milk if it's too thick.
  10. Spread the icing over the cooled cake.
Notes
  1. This cake will keep for 3-4 days in an airtight container.
Adapted from The Sweet Life
cook fast eat slow https://www.cookfasteatslow.com/

Chewy Dark Chocolate Chunk Cookies with Sea Salt (gluten, grain and dairy free)

When you read the ingredient list for these cookies, you can’t possibly believe that they turn out as good as they do. 

A weekend baking treat for those who live on restricted diets for health reasons, or for anyone who wants to try a different method of baking, without using flour or grains of any kind. 

The sugar used in this recipe is coconut sugar, but if you wanted to make them and you don’t have it, you can substitute raw sugar. Coconut sugar is currently trending as a sugar that is ‘not refined’ and therefore better for you than refined or processed sugars. At the end of the day, it’s still sugar and we shouldn’t be eating heaps of it. If you have blood sugar problems, then these biscuits are still probably not the best thing for you.  However, compared to store-bought biscuits and other recipes, these are overall lower in sugar.

To make these dairy free, you just need to use a good quality 70% – 85% dark chocolate or a dairy free chocolate that is available in most supermarkets these days. 

They are loved by all in this house…the only issue is this recipe makes approx 13, which means they don’t last long for a family of 5!

This recipe is from www.slimpalate.com 

Chewy Dark Chocolate Chunk Cookies with Sea Salt
Serves 12
A chewy chocolate cookie that is gluten, grain and dairy free
Write a review
Print
Prep Time
5 min
Cook Time
12 min
Total Time
17 min
Prep Time
5 min
Cook Time
12 min
Total Time
17 min
Ingredients
  1. 1 cup almond butter (this can be purchased in the supermarket in the Health Food section or speads isle)
  2. 3/4 coconut or raw sugar
  3. 1 egg
  4. 1 egg yolk
  5. 1 1/2 teaspoons vanilla extract
  6. 1 teaspoon baking soda (bi-carb soda)
  7. 1/4 teaspoon salt
  8. 100 grams good quality dark chocolate, chopped into small chunks
  9. sea salt for sprinkling
Instructions
  1. Preheat oven to 180 degrees celsius.
  2. Line 1 large baking tray with baking paper, or 2 smaller trays. The biscuits need room to spread.
  3. Place the almond butter in a medium size bowl.
  4. Whisk together the egg and egg yolk in a separate small bowl.
  5. Stir the sugar into the almond butter, then add baking soda, salt and vanilla and stir until thoroughly mixed.
  6. Add the egg mixture and stir again.
  7. Fold through the chopped chocolate.
  8. Place a heaped dessert spoonful of mixture into the palm of your hand, roll into a ball and place on tray. Lightly flatten.
  9. Bake in the oven for 10-12 minutes. They will be ready when they are slightly golden, firm on top and have spread.
  10. Remove from oven, lightly sprinkle the top of each cookie with sea salt and leave to cool for 10 minutes on the trays.
  11. These will last a couple of days in an airtight container.
Notes
  1. The Almond Butter I use for these cookies is the Macro brand from Woolworths and is called Almond Spread. The ingredients is 100% raw almonds.
Adapted from Slim Palate
cook fast eat slow https://www.cookfasteatslow.com/

French-style Summer Fruit Tart

I love the rustic nature of this tart.

Usually when cooking with pastry, you need to get things ‘just right’. Rolled to an even thickness and then into a perfect shape for a tin. Then the pastry needs to make it into the tin without breaking before it is ‘blind baked’, a process whereby you place dried beans or rice on top of some baking paper inside the tart shell to bake it before the filling is added. I don’t mean to scare you off, it isn’t overly difficult, but it can be fiddly and time consuming if you have not done it a few times over. 

Never fear friend, as none of this is required with this tart, hence why I was able to make it over the weekend, without much stress or fanfare, even as the kids where running in and out and the Roast Chook was cooking away in the oven. 

My in-laws had arrived to stay for a few days and came bearing freshly picked blackberries from the side of the road near their farm, on the other side of the Blue Mountains. 

My perfect kind of present, I washed them and placed them in a bowl and wondered what I would do with them next. 

Enter Maggie Beers simple French-style tart. 

Her famous sour cream pastry is made in the food processor, rested as all pastry needs in the fridge and then rolled out to a rough thickness, in a rough shape of whatever takes your fancy. 

A beautiful mixture, known as a ‘frangipane’ is also made in the food processor. This french term basically describes a mixture of butter, sugar, eggs and ground almonds and is what you will almost always find in store-bought fruit tarts. 

Then you get to place whatever fruit you love over the top, fold the edges over and bake the whole tart in the oven. 

Enjoy it warm from the oven with cream or ice-cream, or, as we also discovered, at room temperature the next day as leftovers with a cup of tea.

I can’t quite put my finger on it, but there is something about bringing a freshly cooked tart or pie to a table full of people that makes me feel completely satisfied, if at least just for that moment. 

I would encourage anyone wanting to start playing with pastry, to begin with this recipe. You can’t stuff it up and then it will give you the confidence to try another more tricky pastry recipe soon.

French-style Summer Fruit Tart
Serves 8
A rustic french-style tart with a shortcrust pastry base, a creamy frangipane filling and topped with fresh seasonal fruits.
Write a review
Print
Prep Time
40 min
Cook Time
45 min
Total Time
1 hr 25 min
Prep Time
40 min
Cook Time
45 min
Total Time
1 hr 25 min
Sour Cream Pastry
  1. 200 grams chilled unsalted butter, chopped
  2. 300 grams plain flour
  3. 1/3 cup sour cream
Frangipane Filling
  1. 125 grams unsalted butter, softened
  2. 150 grams castor sugar
  3. 2 eggs
  4. 1/4 cup brandy or whisky
  5. 2 tablespoons plain flour
  6. 200 grams almond or hazelnut meal
  7. approx 3-4 nectarines, sliced thinly into wedges (or if using plums or apricots, just halve them)
  8. 125 grams of fresh blackberries
  9. 2 teaspoons milk plus 1 egg yolk (for glazing the pastry)
For the Pastry
  1. Pulse butter and flour in a food processor until it resembles breadcrumbs.
  2. Add sour cream and pulse until it comes together in a ball and clears the sides of the bowl.
  3. Remove, wrap in plastic wrap and place in the fridge to chill for 20 minutes.
  4. Preheat oven to 190 degrees celsius.
For the Filling
  1. Place the butter and sugar in the food processor and whiz until thick, pale and creamy.
  2. Add the eggs one at a time, stopping and scraping down the sides occasionally.
  3. Add the remaining ingredients and whiz until combined.
  4. Set aside.
  5. Line a large baking tray with baking paper.
  6. Roll pastry on a lightly floured surface, till about 5mm thick. It can be rectangle, round or oval, whatever takes your fancy.
  7. Spread the filling over the top, leaving a 5cm boarder.
  8. Arrange the fruit on top.
  9. Fold the pastry edges over, and using a pastry brush, brush the edges with the combined milk and egg yolk.
  10. Bake in the oven for 40-45 minutes or until fruit soft and pastry golden.
  11. Dust with icing sugar to serve.
Notes
  1. Any fruit you like would work in this tart. Peaches, plums, apricots, cherries, raspberries, pears or apples. If the fruit is smaller, you will obviously need more to fill the tart. For example you may need 10-15 small plums or apricots instead of 4 large nectarines as the recipe states.
  2. You can use as much or as little fruit as you like.
Adapted from Delicious Magazine February 2011
cook fast eat slow https://www.cookfasteatslow.com/