Apple and Almond Cake (gluten free, dairy free)

These school holidays came and went in a whirlwind of park visits, skateboarding, basketball, soccer, play dates, bush walks, camp fires and bike rides.

It is my pleasure and joy to be raising three gorgeous humans who need enormous amounts of physical activity each day. It’s like constantly moving is their oxygen and absolutely essential for their survival. 

I am a slow learner, however, and always start off school holidays in the exact same, girly way.

“Boys, lets stay in today. Let’s have a PJ day, watch movies, play with toys, sip hot drinks and catch up on how each other is going. It’s been such a busy term, let’s just go slow today.”

This works NEVER.

And I am declaring it publicly so that you will remind me before the next holidays roll around NOT TO DO THIS AGAIN.

By 9.30am on Day 1 of holidays, I have ordered all cushions back on lounges instead of being used as weapons, I have yelled things like “please get off your brothers head/please take the ball outside/please stop yelling at each other/the house is not a gymnasium/get that skateboard outside/no, you cannot have WIFI yet/you can’t shoot water guns inside/stop swinging on the chair/I asked you to get off your brothers head.”

And then, we all get promptly dressed, pack the car with bikes, skateboards, RC cars, basketballs and soccer balls and head to the park. 

Peace at last. 

After a couple of days we did get into our holiday rhythm and enjoyed time with extended family and friends amongst many activities.

As exhausted as I am at trying to keep up with them during holiday time, I realise these years with our boys are precious as we make memories and experience stuff together. I know I will look back on them with fondness, remembering the time spent together more than how tired I felt. I hope so anyway.

One of our favourite days was spent with friends picking apples at an orchard. I felt like a real country bumpkin in my cowgirl boots, carrying my red bag and filling it with all types of apples, while recipe ideas swam through my head. Meanwhile the boys ran, climbed the trees to get the best apples, jumped on tractors, ran some more and picked as many apples as they could.

11 kilos in total.

Yes folks, this is the first of a few recipes coming your way with apples as the star ingredient. 

I think Apple Picking may indeed become an Autumn school holiday tradition in our house. 

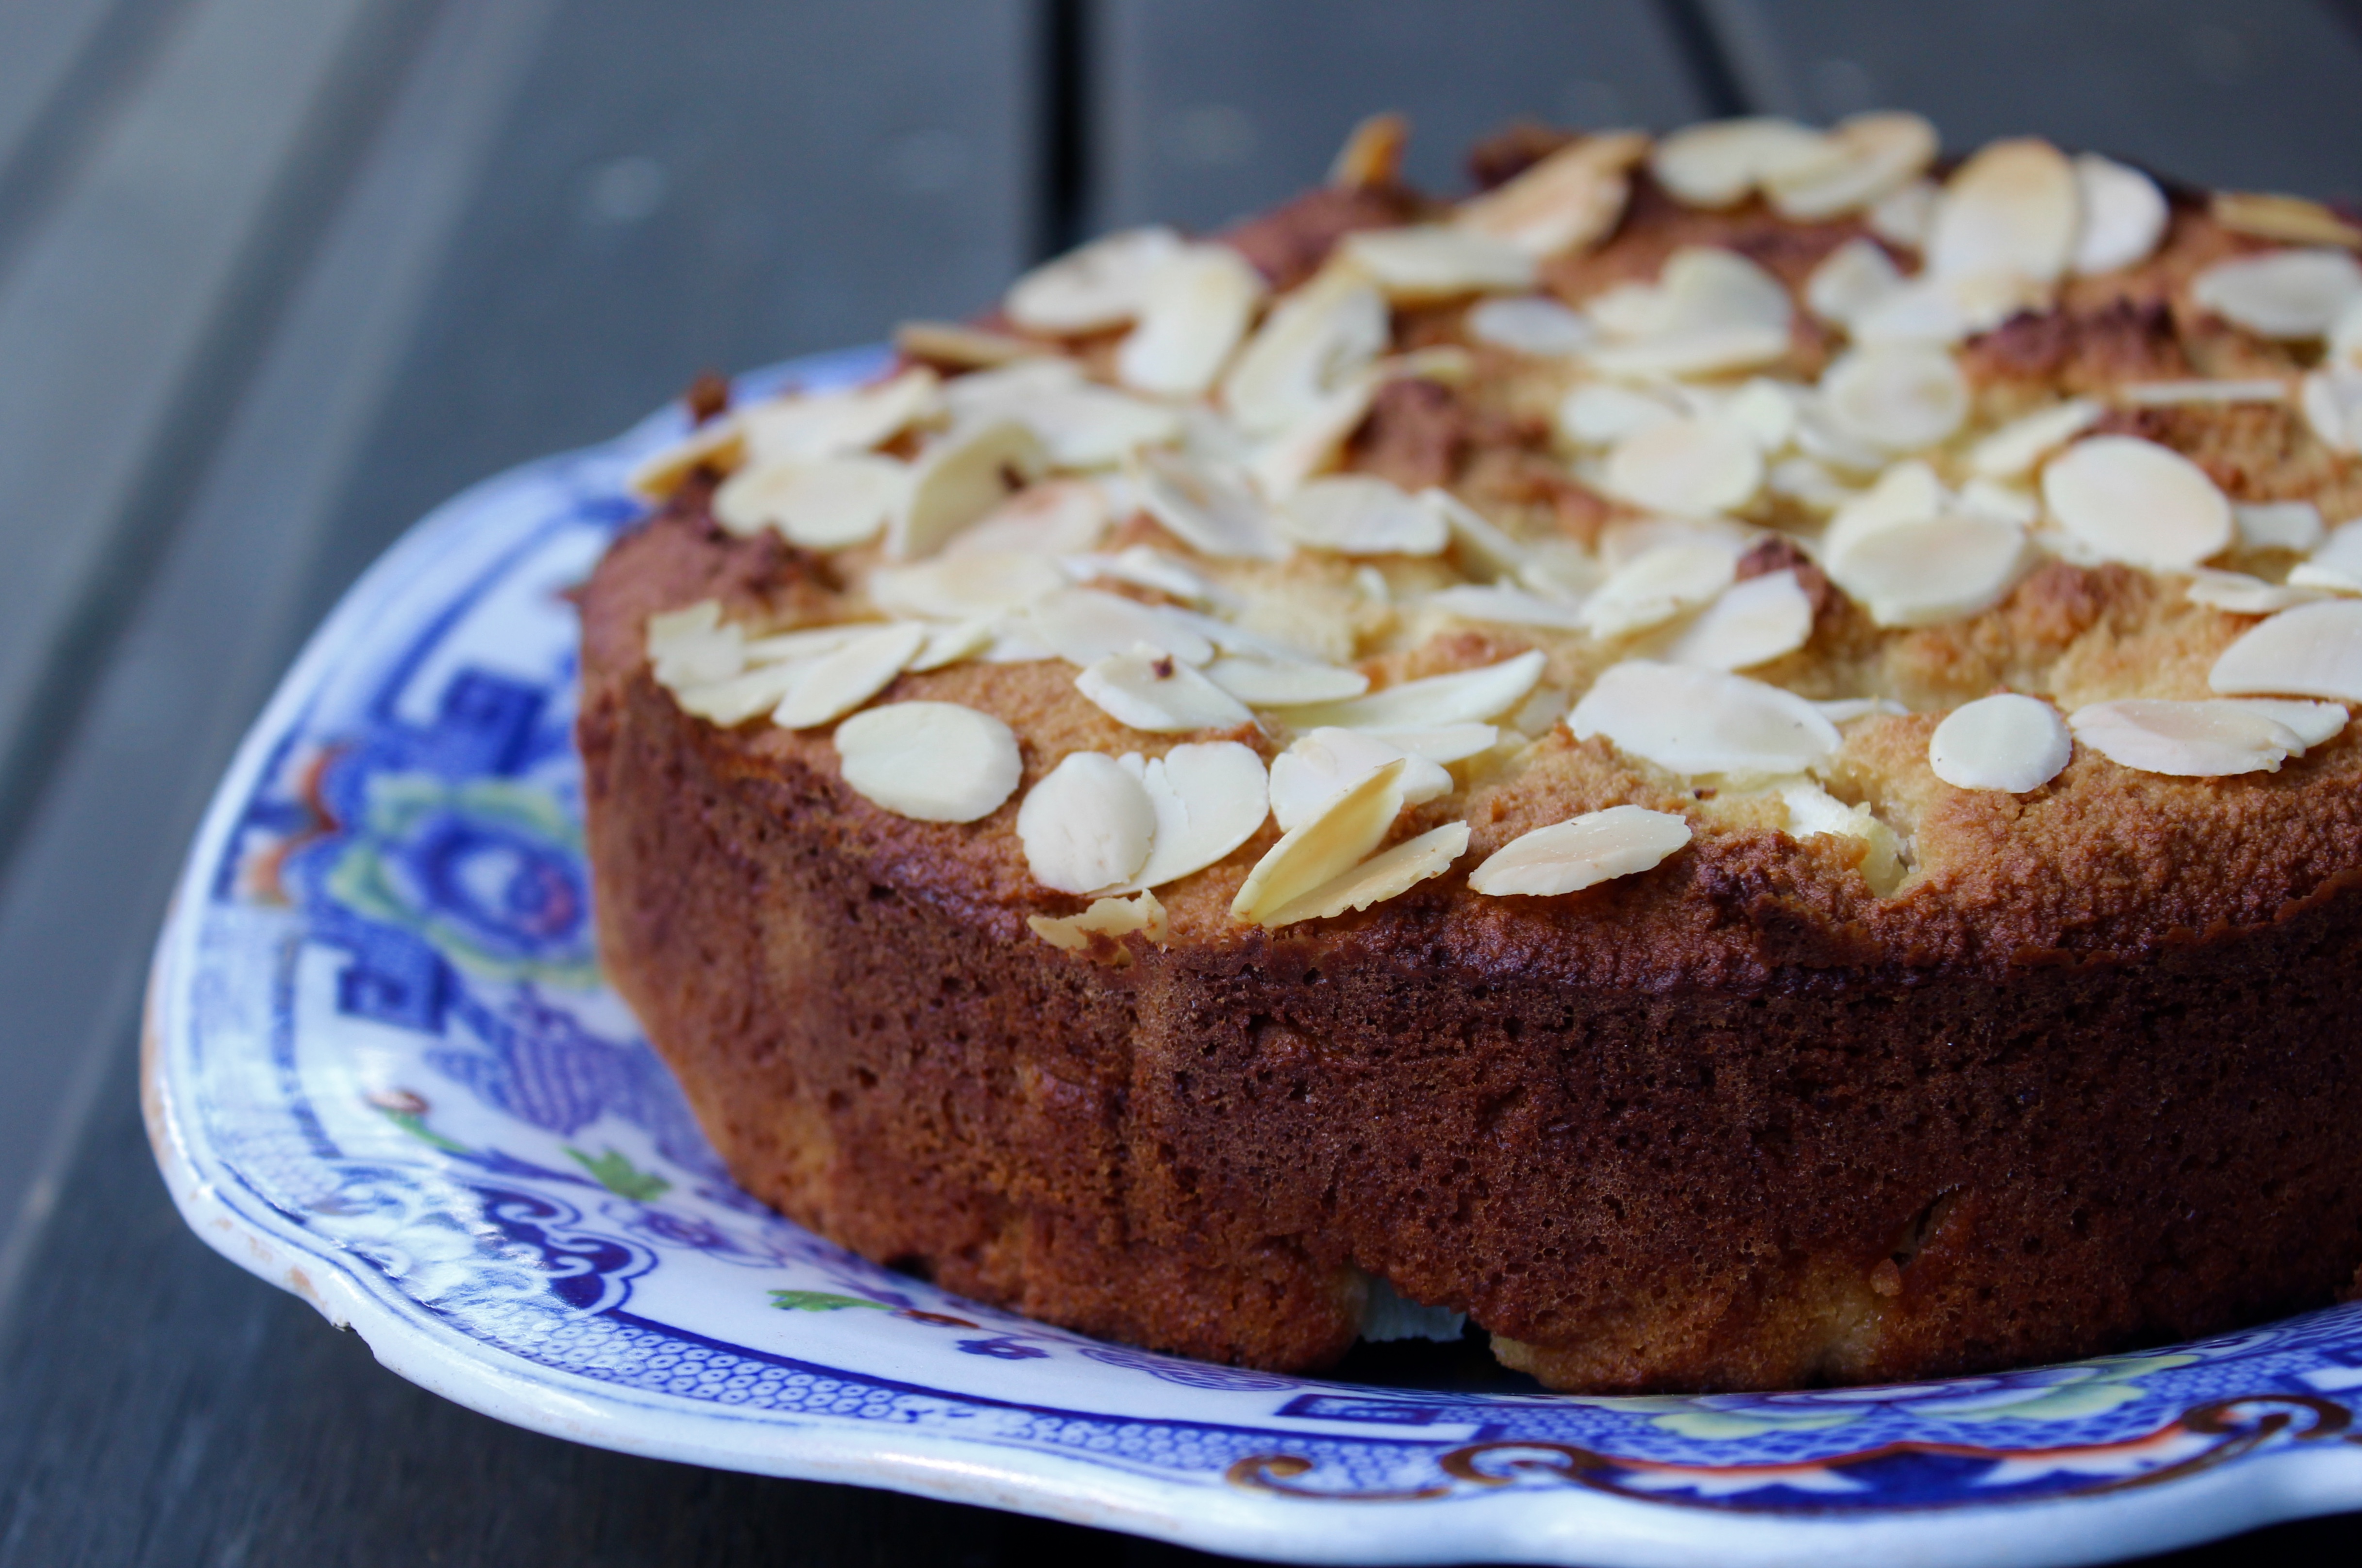
This very simple, one bowl cake from the Healthy Chef, Teresa Cutter, has minimal ingredients and is a moist, almost friand-like cake. It’s beautiful warm, and if you can have dairy, served with cream or custard.

As school went back today, I thoroughly enjoyed making it, eating it slowly, still warm from the oven and then opening my computer and writing about it. And I did all of that without uttering one word. 

I feel better already. 

IMG_8404


Apple and Almond Cake (dairy free and gluten free)
Serves 8
An apple and almond, friand-like cake, with a hint of orange and honey.
Write a review
Print
Prep Time
10 min
Cook Time
50 min
Total Time
1 hr
Prep Time
10 min
Cook Time
50 min
Total Time
1 hr
Ingredients
  1. 2 cups (200 grams) almond meal, (or hazelnut meal)
  2. 1 teaspoon baking powder, gluten free
  3. 1/4 cup light olive oil
  4. 1/4 cup honey
  5. zest of 1 orange
  6. 2 eggs
  7. 1 teaspoon vanilla extract or paste
  8. 1 large apple, peeled, cored and finely diced
  9. flaked almonds to garnish
Instructions
  1. Preheat oven to 160 degrees celsius.
  2. Line a 16cm or 20cm round baking tin with baking paper, on the bottom and sides.
  3. Combine almond meal, baking powder, oil, honey, eggs, zest and vanilla in a mixing bowl and stir to thoroughly combine.
  4. Fold in the apple.
  5. Press into the tin and scatter with a handful of flaked almonds.
  6. Bake for approx 50 minutes, or until golden and the middle springs back when pressed lightly.
  7. Let stand in the tin for 30 mins to cool.
  8. Enjoy warm or at room temperature.
Adapted from The Healthy Chef
cook fast eat slow https://www.cookfasteatslow.com/

Strawberry & Yoghurt Cake (egg free)

It’s a sign that your children are getting older, when they no longer request birthday cakes from the Women’s Weekly Birthday Cake cookbook, and instead choose a cake like this one.

My Soccer, V8, Formula 1, BMX, Rugby and Go-Kart loving son, who typically doesn’t like anything sweet and usually chooses chips over cake, requested this cake for his birthday this year.

The only way to describe this cake is simply lovely.

Originally a Neil Perry recipe, I have lowered the sugar a little, and found no difference with the way it cooked and tasted, and changed the way he serves it to suit my family.

For those not use to cooking with polenta, it gives a little ‘sandy’ texture to the cake, which adds to this cakes personality.

The cooked strawberries go a little ‘jammy’ and when eaten warm, you feel like you are eating a beautiful cake with pocketfuls of jammy goodness.

And to top it all off, it’s exceptionally simple to make. One bowl, a whisk and a spoon…..even my 4 year old helped to make this one.

Strawberry & Yoghurt Cake (egg free)

  • Prep Time: 20m
  • Cook Time: 1h
  • Total Time: 1h 20m

Ingredients

  • 200 grams polenta
  • 200 grams self-raising flour
  • 200 grams castor sugar
  • 1 teaspoon baking powder
  • 300 grams natural yoghurt
  • 110 grams butter, melted
  • 200 milliliters warm water
  • 300 grams strawberries, washed, hulled and chopped
  • extra strawberries kept whole to decorate
  • icing sugar to dust

Method

  1. Preheat oven to 170 degrees celsius.
  2. Grease and line with baking paper a 20cm springform tin.
  3. Place all the dry ingredients in a mixing bowl and whisk with a hand whisk to combine.
  4. Make a well in the centre, add yoghurt, butter and warm water and mix with a spoon until well combined.
  5. Stir through the strawberries gently.
  6. Bake for 1 hour or until a skewer inserted comes out clean. This may be different for different ovens. If not cooked after 1 hr, keep checking it every 15 minutes after.
  7. Leave to cool in tin on a cooling rack for 15 minutes, then remove from tin to cool completely.
  8. Dust with icing sugar and top with remaining strawberries to serve.
  9. This cake will keep for 2-3 days covered in the refrigerator.


Chocolate, Date and Chia Slice (gluten free, dairy free, refined sugar free)

I have many family and friends who face daily health battles, most of which come with strict dietary restrictions, in order to help control, slow down or halt their painful and debilitating conditions.

I call them the ‘silent sufferers’.

To most people, their symptoms and daily struggles cannot be seen. It’s not like a broken arm with a cast or condition that will heal in a few months. Auto-immune diseases such as Arthritis and Lupus, Coeliac Disease, Digestive disorders, Diabetes, Thyroid problems. These are just a few of the conditions that impact many around us each day, probably more than we know. These conditions do not have a ‘cure’ and sufferers will live with them and their effects forever.

Then there are all those who can’t pin point exactly what their health issue may be, but find themselves ‘intolerant’ to so many foods.

It is wonderful that relief from pain and the slowing down of a diseases’s progress can be achieved through making dietary changes.  But for those people already struggling, another challenge arises in relation to their food and eating.

Celebrations, entertaining, just stopping off somewhere for a quick lunch can be a problem. Going out to dinner becomes difficult, often a phone call to a restaurant ahead of time is needed to ensure there will be something suitable for them to eat. The people I know who suffer, hate a fuss to be made and don’t like the extra attention it brings, so they often miss out, go without or even don’t attend functions if it’s all going to be too hard.

I don’t think those of us who eat what we want, when we want always realise how hard it can be.

So to my family and friends suffering; you are AMAZING. You are strong, determined, disciplined, BRAVE, courageous and you care about your health so much you will do whatever you can to improve or maintain it.

And to those of us who don’t suffer, we can work at being a little more understanding and sympathetic. If you have a loved one on a restricted diet, find out about it, take an interest. Maybe it means you need to learn a new recipe, that’s okay. Try and remember to cater for their needs if you are cooking for them. Ask ahead of time and show that you’ve gone to a little extra effort to make sure there is something for them to eat at the next family get together or dinner party.

So, onto the recipe….this is a yummy, moist ‘brownie’ style slice that is gluten, dairy and refined sugar free.

It has even received the tick of approval from the men and women in my husbands office who thought it was a ‘normal’ brownie!

Ingredients

1 1/2 cups water
1/3 cup cocoa
1/4 cup rice malt syrup
200gm dried pitted dates, chopped
1/4 cup chia seeds
2 eggs
1 t vanilla extract
100gm good quality 70% dark chocolate (milk free)
50gm coconut oil
1 teaspoon cinnamon
1/2 cup coconut flour

Method

Preheat oven to 170 degrees celsius.

Grease and line with baking paper, a slice tin (approx 25cm x 15cm).

Place water, cocoa and rice malt syrup in a saucepan and stir over medium heat until a smooth paste.

Remove from the heat and add dates and chia seeds and set aside for 30 minutes to cool and thicken (the chia seeds will act as a thickening agent and the mixture will thicken as it cools).

Melt the chocolate and coconut oil together in the microwave, approximately 50 seconds on high. Remove from microwave and stir until melted and combined.

Lightly whisk eggs and vanilla extract and add to date mixture.

Add the coconut flour and cinnamon to the date mixture.

Add the slightly cooled melted chocolate mixture to the date mixture.

Mix thoroughly and spoon into the tin.

Bake for approximately 30 minutes until firm when lightly pressed.

Leave to cool in tin then remove and cut into squares.

Dust with cocoa powder or icing sugar to serve.

Soft-Centred Chocolate Puddings

Easter. This is one of our favourite times of the year.

We step away from the busyness of our normal schedule and head away to the country for a few days. The boys will make cubbies, race billy carts and play countless hours of soccer and cricket. One of my favourite things to do on this weekend every year, is to start a new 1000 piece puzzle with my eldest son. My middle son will challenge me to games of Bocce, and will beat me every time, and our littlest man will spend hours moving a pile of rocks from one place to the next with a Tonka Truck.

They will wear themselves out in the day and crash at night. As parents everywhere will know, this is a win win for everyone.

Night time descends. The fire is lit and I dust off that book that has been on my bedside table for far too long, or the board game cupboard is raided and I battle it out till my husband wins or one of us is asleep!

It’s simple and quiet and we all feel ourselves breathe deep again.

As comforting as all that sounds, it’s actually not the reason why it’s one of our favourite times of the year.

The fact is we start off this weekend of rest and reflection in church, remembering the ‘Amazing Grace that saved a wretch like me.’  The enormity of what Jesus did for me by dying on the cross, hits me every time. I am overwhelmed, with gratitude, that He would rather die than live without me.

As Easter Sunday rolls around, our boys will wake to find an Easter egg waiting for them and this time the conversation will be around why we use eggs to represent New Life at Easter. New Life, New Hope, Forgiveness and New Beginnings.  A fun Easter egg hunt always follows.

Whatever this weekend holds for you, I hope you get a chance to reflect on God’s Amazing Grace in sending Jesus. You may also find some extra time to cook and if so, these Soft-Centred Chocolate Puddings are the perfect Autumn dessert to cook for your family and friends. Enjoy!

IMG_5036

 Soft-Centred Chocolate Puddings

Recipe from Skye Gyngell’s cook book ‘My Favourite Ingredients.’

A few extra tidbits:

*  These puddings could be made with a dairy free spread instead of butter and dairy free chocolate or 70% dark chocolate that contains no milk.

*  Quinoa flour can be substituted for the plain flour to make these gluten free.

* They can be made up to a day in advance and refrigerated, uncooked. If you make them in advance, make sure you bring them to room temperature before cooking, or, if cooking straight from the fridge, you’ll need to add at least 5 minutes to the cooking time.

Ingredients

150gm unsalted butter, chopped

300gm dark chocolate, chopped

4 eggs

3 egg yolks (place egg whites in a small snap lock bag and throw in the freezer. I have a recipe coming soon to use these!)

150gm castor sugar

50gm (approx 1/4 cup) plain flour

Method

Preheat oven to 200 degrees celsius

Lightly butter and dust with cocoa, 6 x oven proof tea cups or individual pudding moulds, approx 200ml in size.

IMG_4984

Place butter and chocolate in a microwave safe bowl and microwave on HIGH for 1 minute. Remove and stir. If it is still not melted, put back in to the microwave for 20 seconds at a time, stirring after each time until melted. (This process is important, as burning the chocolate in the microwave is very easy. It’s best to melt it 80% of the way and finish off stirring it till completely smooth)

IMG_4989

Place sugar, eggs and egg yolks in the bowl of an electric mixer and mix on medium speed until it’s pale, thick and mousse like.

IMG_4992

Gently fold chocolate mixture into the egg mixture till combined.

Sift the flour into the mixture from a height, and gently fold through.

Place into pudding moulds and either refrigerate if you are preparing in advance or place onto a baking tray and put straight into the oven and cook for 8-10 minutes. You are looking for a just- cooked and puffed up top, but if you press lightly, you know it’s gooey underneath. You are best to start off cooking it for less time and add a few minutes. If you overcook, they will still be beautiful chocolate puddings, but won’t have a soft centre.

Dust with icing sugar and serve with cream or ice cream.

IMG_5051


Banana Bread – two ways

Bananas have some great qualities –  they are high in Potassium, which helps regulate normal blood pressure, Magnesium for our muscles, Fibre, Vitamin C and Vitamin B6, which help to make red blood cells and antibodies to help us fight infections. Any of the B vitamins are known as ‘water soluble’ which means we don’t store them in our bodies and so we must keep replenishing them from our diet each day. Bananas are also a source of carbohydrates. If you are trying to manage Diabetes, you do have to take into consideration the impact they may have on your blood sugar levels.

Each time a banana goes bad in the fruit bowl or I find one a little squished and uneaten in a lunch box, it’s thrown in the freezer.

Once there is a small stash and I am craving my freezer space back, Banana Bread is made. It’s perfect straight out of the oven for afternoon tea or sliced, wrapped and frozen for school lunch boxes.

The following recipes are two of my favourites. Truth be told, I have many more (Sticky Date & Banana, Banana & Choc Chip etc), but I thought I would start with these two. They are quite different, but loved nonetheless.

The Banana & Raspberry Bread can be made by anyone. It’s a ‘throw it all in the bowl and stir’ batter and it never fails. Apart from being Dairy free, it’s full of all the normal things that make Banana Bread look and taste good – fat and sugar.

The Banana & Coconut Bread, from one of my favourite Chef’s, Teresa Cutter (aka The Healthy Chef), is Gluten free, Dairy Free, Grain Free and Refined sugar free. The addition of Coconut flour adds great soluble fibre and the Chia Seeds keep the loaf moist and add Omega 3’s, which are needed by the brain to function properly.

I am making more and more of this type for our every day eating and saving the Banana & Raspberry Bread for those special days.

Banana & Raspberry Bread

Makes 1 loaf

IMG_4786

Ingredients

1 3/4 cup plain flour
1 teaspoon bi-carb soda
3/4 cup castor sugar
2 eggs
1 1/2 cups mashed banana (approx 3 large size bananas)
1/2 cup rice bran oil
1/3 cup water
1 cup raspberries (if using frozen, don’t defrost first and make sure they are from Australia or Europe!)

Method

Preheat oven to 170 degrees celsius (150 fan forced)

Combine everything, except the raspberries, in a bowl and mix till combined and smooth. Gently stir in raspberries.

Pour into a well greased and lined loaf tin and bake for approx 1 hour. If it starts to brown quickly, cover it in foil and continue cooking. Cool in tin for 10 minutes then turn out onto a wire rack to cool.

Banana & Coconut Bread 

Recipe from Teressa Cutter, thehealthychef.com

Makes 1 loaf

IMG_4394

Ingredients

400gm over ripe bananas, (approx 4 medium size bananas)

6 eggs

4 fresh pitted dates

2 teaspoons vanilla extract

60ml of coconut oil

1/2 teaspoon cinnamon

2 teaspoons gluten free baking powder

1/2 cup coconut flour

1/4 cup chia seeds

Method

Preheat oven to 170 degrees celsius (150 fan forced)

Combine bananas, eggs, dates, vanilla, oil, cinnamon and baking powder in a food processor and blend till smooth.

Add the coconut flour and chia seeds, mix through and then sit for 15 minutes to allow the chia seeds and coconut flour to expand.

Pour into a greased and lined loaf tin and bake for 50-55 minutes. (You can decorate the top of the loaf with flaked coconut if you like at this stage). Cover with foil if browning too quickly.

Cool in tin for 10 minutes before turning onto a wire rack.

This loaf is best stored in the fridge and slightly heated or toasted before serving (I love to top it with ricotta and honey) It freezes well too.