Spiced Pumpkin Bread

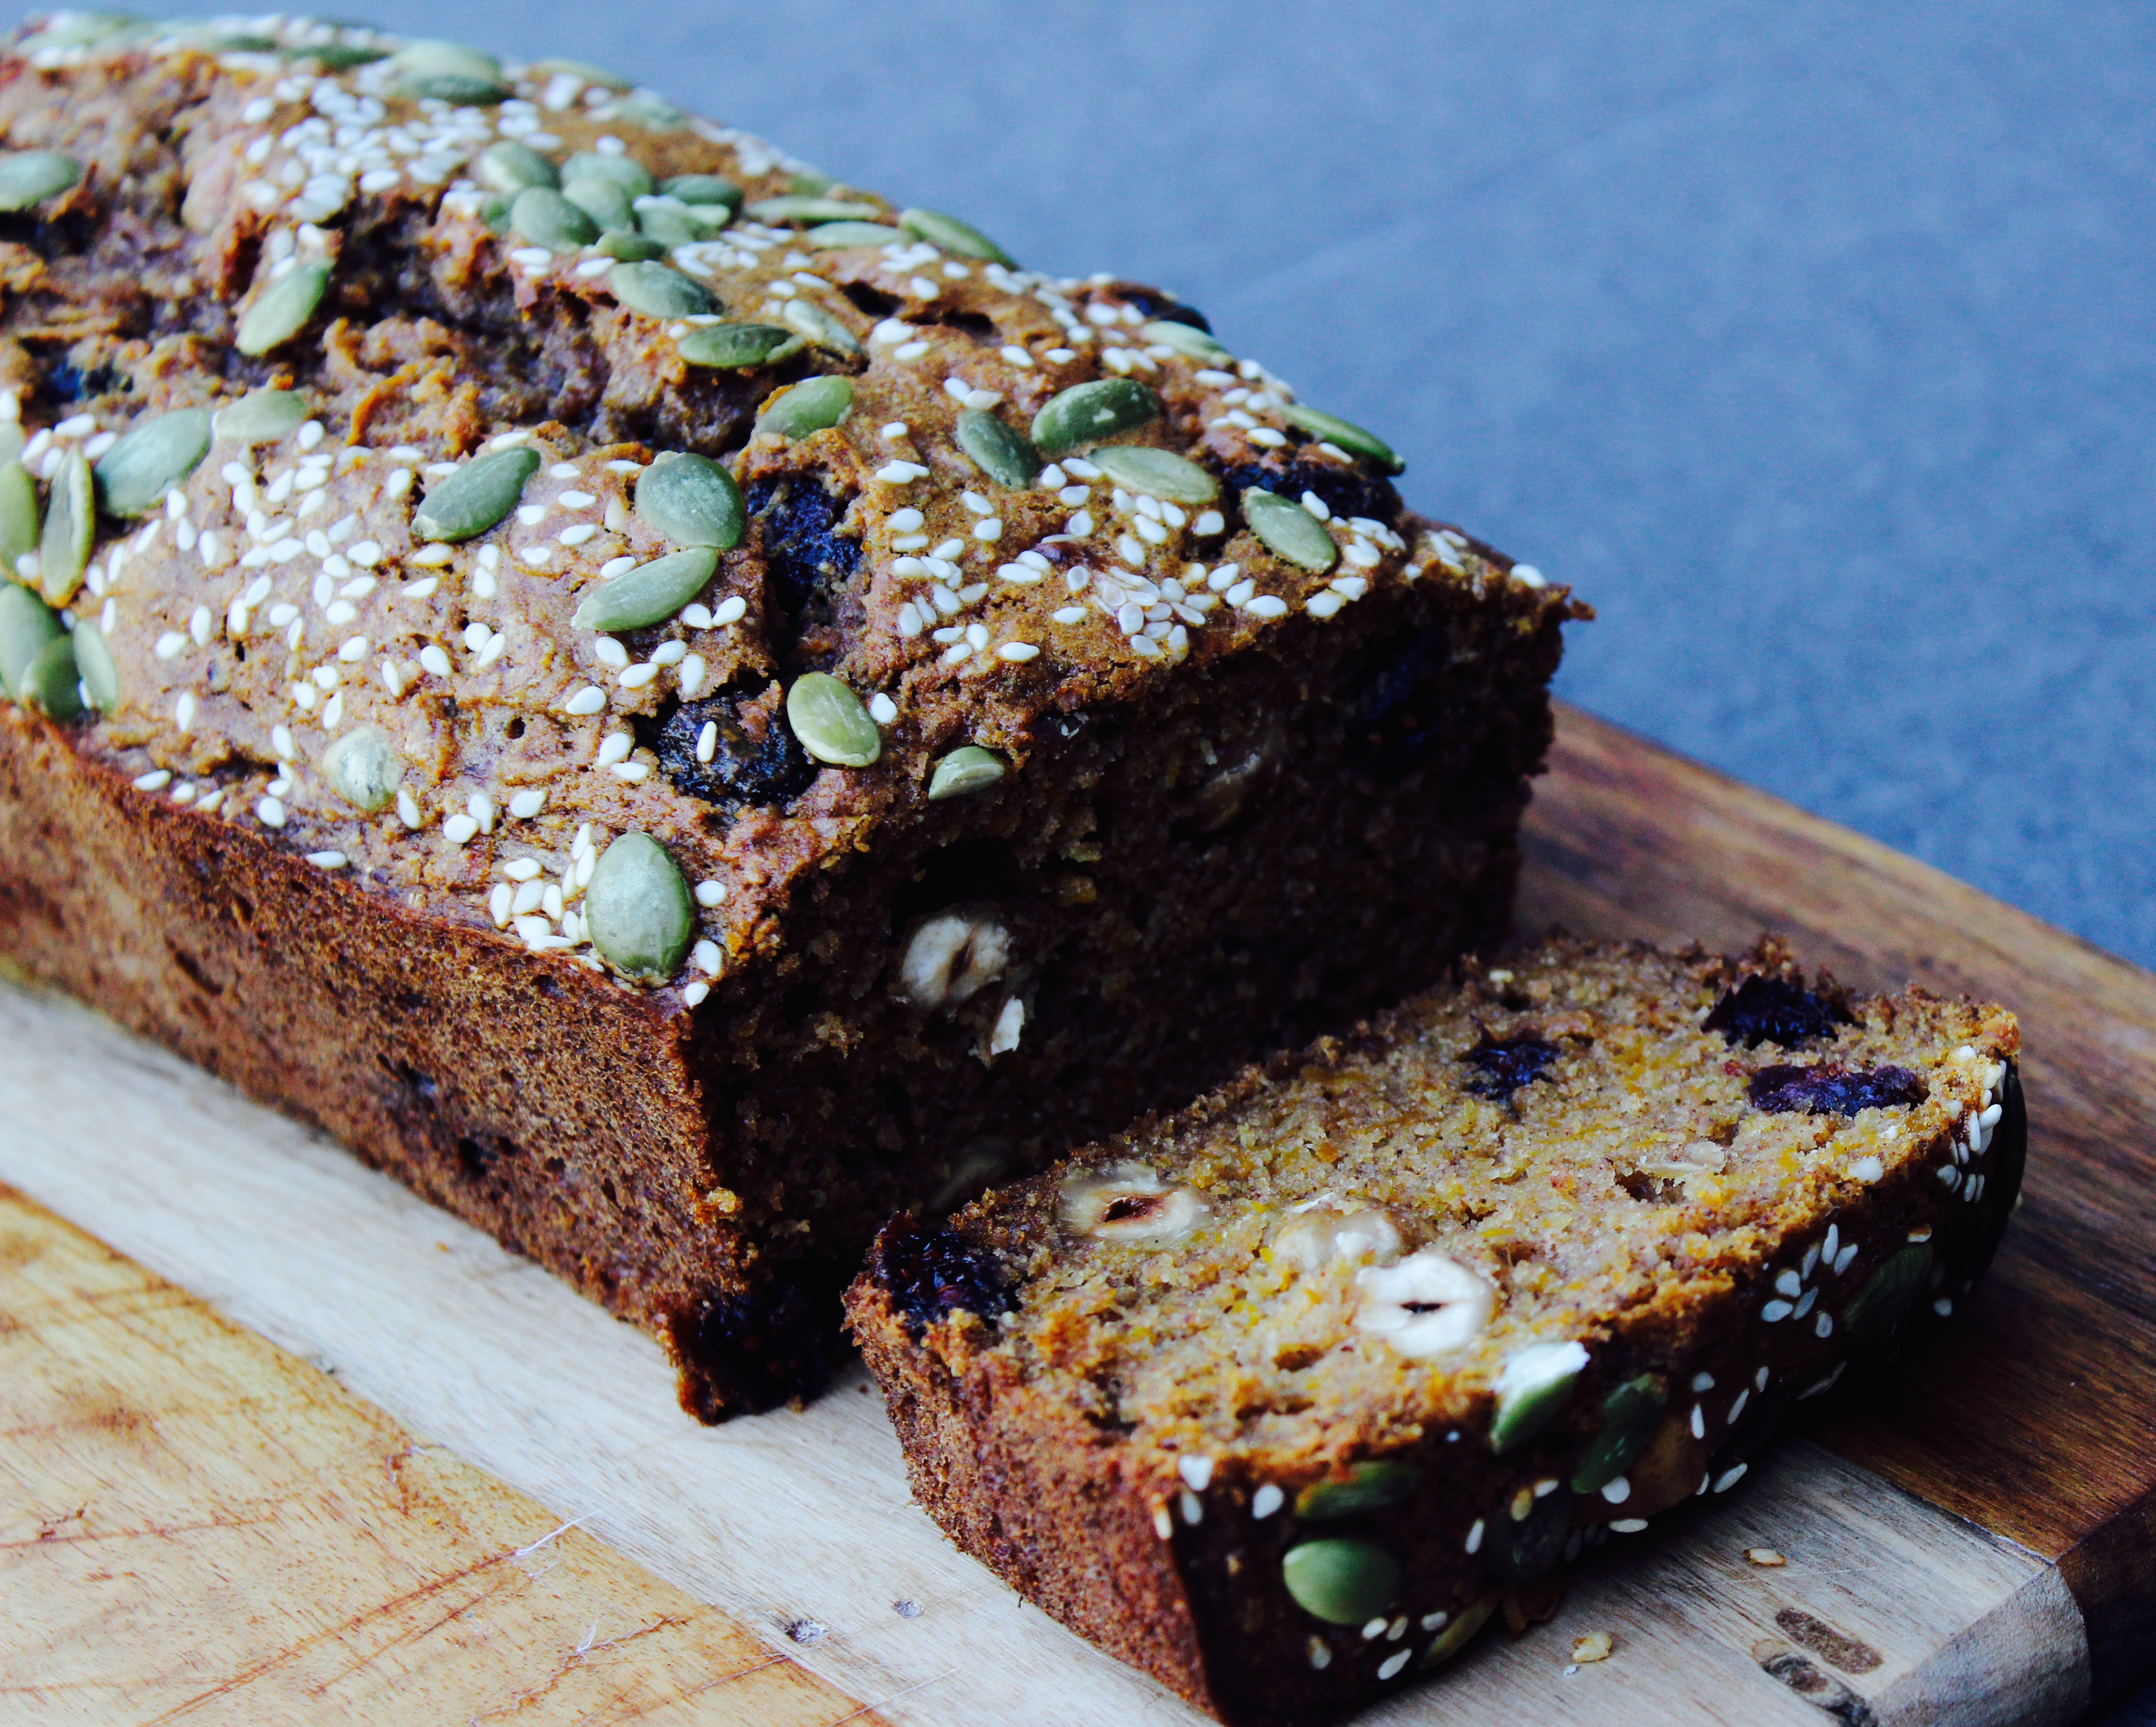
So…. I didn’t exactly tell the boys that the star of this loaf was pumpkin.

I just left it on the bench, still a little warm from the oven, for when they arrived home from school. 

The one who hates banana bread, said “this better not have bananas in it!” and I was able to answer confidently that it did not!

No-one guessed the main ingredient, as it was gobbled up and grubby hands reached for seconds. 

I am planning on making another loaf soon, this time leaving out the nuts so I can send it to school for morning tea. 

The smell of this baking made me think of my American sister-in-law and transported me to a White Christmas in North America. Pumpkin and spices baking together in the oven will do that to you. 

Feel free to sub gluten-free plain flour and soy/rice/nut milk to make this a gluten free/dairy free loaf. 

Spiced Pumpkin Bread
A moist pumpkin loaf, with craisins, nuts and a hint of spice.
Write a review
Print
Prep Time
10 min
Cook Time
50 min
Total Time
1 hr
Prep Time
10 min
Cook Time
50 min
Total Time
1 hr
Ingredients
  1. 1 cup wholemeal spelt flour or wholemeal plain flour
  2. 1/2 cup brown sugar
  3. 1 teaspoon bi carb soda
  4. 1 1/2 teaspoon ground cinnamon
  5. 1/2 teaspoon ground nutmeg
  6. 1/2 teaspoon ground ginger
  7. 1 cup craisins, raisins or dates
  8. 1 cup of nuts of choice, roasted and chopped (pecans, walnuts or hazelnuts work well)
  9. 1 1/2 cups of grated raw pumpkin
  10. 2 eggs
  11. 1/3 cup olive oil
  12. 1/2 cup milk
  13. 1 1/2 teaspoons vanilla extract
  14. Pepitas (pumpkin seeds) and Sesame seeds for topping
Instructions
  1. Preheat oven to 180 degrees celsius (160 degrees fan forced)
  2. Grease and line a loaf tin.
  3. In a large bowl, combine flour, sugar, bicarb soda and spices.
  4. Whisk with a balloon whisk till there are no lumps.
  5. Add in the craisins, nuts and pumpkin.
  6. Stir till combined.
  7. In a separate bowl, whisk together the eggs, oil, milk and vanilla.
  8. Add to the dry ingredients and stir till combined.
  9. Pour into loaf tin and sprinkle with seeds.
  10. Bake for 50 minutes or until a skewer inserted in comes out clean.
  11. Leave to cool in tin for 10 minutes and then turn out onto a wire rack to cool completely.
Notes
  1. This loaf freezes well. Just slice and wrap each piece separately.
Adapted from Mix and Bake
cook fast eat slow https://www.cookfasteatslow.com/


Chocolate Cherry Friands (gluten free)

Friands, originating in France, are typically an oval shaped, small cake, made with almond meal, butter, egg whites and powdered (we know it as icing) sugar. 

According to Wikipedia, the word Friand means “dainty, or a gourmet who delights in delicate tastes.”

At our cocktail-party style wedding reception, trays and trays of friands were handed out as part of the dessert. I have always had a soft spot for them and would order one over a muffin or large slice of cake any day of the week. 

Made well, they should be moist and springy and not too sweet. 

A standard Friand recipe will have only a small amount of flour added to the almond meal, so substituting gluten-free plain flour works beautifully in a friand every time. 

Black Forest or Cherry Ripe lovers, this recipe is for you. The dark chocolate, coconut and dried sour cherries make this recipe a little different to the standard berry or citrus friand you always find in the shops. 

For serious chocoholics, I would add an extra 100 grams of dark chocolate, chopped into small chunks and fold it through with the cherries at the end. 

Chocolate Cherry Friands
Serves 12
A moist chocolate friand with coconut and dried sour cherries.
Write a review
Print
Prep Time
10 min
Cook Time
20 min
Total Time
30 min
Prep Time
10 min
Cook Time
20 min
Total Time
30 min
Ingredients
  1. 100 grams dark chocolate, chopped (plus 100 grams extra if you want chunks through it)
  2. 175 grams unsalted butter, chopped
  3. 1 cup almond meal
  4. 6 egg whites
  5. 1 cup powdered (icing) sugar
  6. 1/2 cup desiccated coconut
  7. 1/2 cup dried sour cherries (dried cranberries would work too if you can't find them)
  8. 1/2 cup plain flour or gluten-free plain flour
Instructions
  1. Preheat oven to 190 degrees celsuis.
  2. Place butter and 100 grams of chocolate in a heat proof bowl and melt in microwave for 1 minute. Remove, stir, and if needed, put back in microwave in 20 second bursts until all melted. Set aside.
  3. Lightly whisk egg whites with a hand whisk till it's a little bubbly, then add chocolate mixture and stir till combined.
  4. Add all other ingredients, except cherries (and extra chocolate if using) and stir till thoroughly combined.
  5. Lightly fold in cherries.
  6. Spoon mixture into lightly greased friand tins, filling 3/4 full.
  7. Bake for 20 minutes, or until risen and it springs back when lightly touched.
  8. Leave to cool in tin for a few minutes and then turn out onto a wire rack to cool completely.
Notes
  1. These will keep for 3 days in an airtight container.
  2. After day 1, they are best enjoyed after being slightly refreshed in the microwave for 15 seconds or so.
cook fast eat slow https://www.cookfasteatslow.com/

1 Minute Lemon & Coconut Mug Cake and Lessons from a Little Blue Fish

I never thought I would be reminded of some important life lessons from an animated movie about a little blue fish.

As I sat watching Finding Dory with the family, I found myself fighting back tears.

open-uri20150608-27674-tmzm40_c7fa1a64

Dory, with her short-term memory loss, really struggled to survive in the ocean and needed a buddy with her most of the time to help guide where she was going.

She had lost her family and she was afraid.

She was different to the other sea creatures and lacked the skills the other fish had to survive.

The creatures that end up helping her find her family had their own difficulties too, such as the Whale shark with bad eye sight and the Octopus, with relationship and commitment issues. Nemo and his dad Marlin, knew what it was like to lose someone they love, but despite their fears of it happening again, agreed to help Dory find her way home.

 Just Keep Swimming.

And when Dory finally made it home, her parents had not given up either.

They had been faithfully waiting for her to make her way home, laying out paths that might help her eventually remember and find them.

finding-dory-movie


You’re in another hard season.

Just Keep Swimming.

You thought maybe the battles were slowing down, or it was your turn for a break from the hard stuff.

But life doesn’t work that way and you find yourself weary and discouraged.

Just Keep Swimming.

Despite the fear and the pain and the difficulty.

Just Keep Swimming.

And don’t swim alone. Gather your crew around you, your imperfect, motley crew of people who love you unconditionally, and get them to pull you along when you don’t think you can go any further.

Do the next thing. Take the one next step.

Don’t look too far ahead, but for today, just don’t give up my friend.

quotes-courage-voice-mary-anne-radmacher-480x480


1 Minute Lemon & Coconut Mug Cake
Serves 1
Lemon and Coconut Cake, mixed and cooked in a mug in 1 minute in the microwave.
Write a review
Print
Prep Time
2 min
Cook Time
1 min
Total Time
3 min
Prep Time
2 min
Cook Time
1 min
Total Time
3 min
Ingredients
  1. 4 tablespoons self raising flour
  2. 2 tablespoons desiccated coconut
  3. 1 tablespoon raw sugar
  4. 3 tablespoons coconut milk (or normal milk)
  5. 1 tablespoon light olive oil
  6. 1 egg
  7. 2 tablespoons store-bought lemon curd
Instructions
  1. Mix flour, coconut and sugar in a 11/2 cup capacity mug or cup.
  2. Mix well.
  3. Add milk, olive oil and egg.
  4. Mix till thoroughly combined.
  5. Gently stir through lemon curd, do not mix in completely.
  6. Cook in the microwave for 50-60 seconds.
  7. It will puff up and rise to the top. If the cake batter is not fully cooked, put in for another 10 seconds or so.
  8. Enjoy immediately with extra curd and cream if desired.
Adapted from Tasty Express
cook fast eat slow https://www.cookfasteatslow.com/

Craisin & Honey Oat Bars

Two of the phrases I will hear the most over the coming weeks are “I am bored” and ” I am hungry.” They will be closely followed by “Can I have screen time?”

If you have school aged kids on holidays, I am sure this sounds familiar to you. 

As my 3 boys grow, keeping up with the what and how much they eat is quite a task. Even for this foodie, it’s quite a job making sure the house is stocked with nutritious food and lots of it for these active and growing boys. 

These Craisin & Honey Oat Bars were my attempt at trying to make a healthy version of a muesli bar. The brief was; nut free so they were suitable for school, low sugar, made with simple pantry ingredients and freeze proof so they’re always available for lunch boxes, impromptu visitors and lazy holiday days. 

These are super easy, and perfect for getting kids active in the kitchen. Just melt, mix and bake. 

One handy tip is they do need to be cut into bars as soon as they are out of the oven. Simply score the lines with a sharp knife and then leave the bars in the tin to cool completely. 

Craisin & Honey Oat Bars
Yields 14
An oat based bar with pumpkin seeds, sesame seeds, coconut and honey.
Write a review
Print
Prep Time
10 min
Cook Time
20 min
Total Time
30 min
Prep Time
10 min
Cook Time
20 min
Total Time
30 min
Ingredients
  1. 1 cup rolled oats
  2. 1 cup (250gm) craisins (dried cranberries)
  3. 1/2 cup desiccated coconut
  4. 1/4 cup pepitas (pumpkin seeds)
  5. 1/4 sesame seeds
  6. 1/2 cup wholemeal plain flour
  7. 1 teaspoon baking powder
  8. 150 grams butter
  9. 2 tablespoons honey
  10. 1/4 cup rice malt syrup (raw sugar)
Instructions
  1. Preheat oven to 180 degrees celsius (160 degrees celsius fan forced).
  2. Grease and line a slice tin.
  3. Combine all dry ingredients in a mixing bowl and stir.
  4. Place butter, honey, rice malt syrup or sugar in a small saucepan and stir over low heat till melted.
  5. Combine butter mixture and dry ingredients.
  6. Place in slice tin, smoothing the top of the slice down with the back of a spoon.
  7. Bake for 20 minutes or until risen and golden.
  8. Immediately score the bar slices with a sharp knife.
  9. Leave to cool completely in the tin.
  10. Cut the bars through and store in an airtight container for up to a week.
Notes
  1. To freeze, wrap bars individually in plastic wrap.
cook fast eat slow https://www.cookfasteatslow.com/


Caramel Apple Pudding

A perfect Autumn dessert, this ‘self-saucing’ beauty is  a mixture of soft apples, buttery sponge and caramel sauce. 

Made with pantry staples, this dessert will feed up to 8 people, making it a great option when having people over at this time of year. 

Thanks to Delicious Magazine, July 2005, it’s been a family favourite for a long time. 

You’re welcome. 

Caramel Apple Pudding
Serves 8
Caramel sauce and soft apples topped with a buttery sponge cake.
Write a review
Print
Prep Time
15 min
Cook Time
40 min
Total Time
55 min
Prep Time
15 min
Cook Time
40 min
Total Time
55 min
Ingredients
  1. 5 large apples, peeled, cored and cut into approx 1cm thick slices
  2. 1 2/3 cups plain flour
  3. 2 teaspoons baking powder
  4. 1 cup (200gm) castor sugar
  5. 200ml milk
  6. 150 grams unsalted butter, melted
  7. 2 eggs
  8. 1 cup brown sugar (you could reduce this to 1/2 cup to make it less sweet)
  9. 1/2 cup golden syrup
  10. icing sugar to dust
  11. custard, cream or ice-cream to serve
Instructions
  1. Preheat oven to 180 degrees celsius.
  2. Grease a 2.5 litre (large) baking dish
  3. Place cut apples in the bottom of the dish
  4. Combine the flour, baking powder, sugar, milk, butter and eggs in the bowl of an electric mixer and mix till combined, thick and pale.
  5. Spread this mixture over the apples.
  6. Combine sugar, golden syrup and 300ml of water in a small saucepan and over low heat, stir until the sugar is dissolved.
  7. Bring to the boil, and then pour gently over the top of the pudding.
  8. Bake for 30-40 minutes in the oven till golden and puffed on the top.
  9. Serve warm with custard, cream or ice-cream.
Adapted from Delicious Magazine July 2005
cook fast eat slow https://www.cookfasteatslow.com/