Banana Hazelnut Bread

‘Procrastibaking’, a common word used amongst home cooks, means to put off something you SHOULD be doing, like filing paperwork, paying bills, ironing or cleaning out the linen cupboard, and turning to baking instead.

Hands up those who can relate? Yep…me too.

A long to-do list of things I don’t want to do, plus a little bit of rain and BAM, I am in the kitchen, measuring, pouring and mixing.

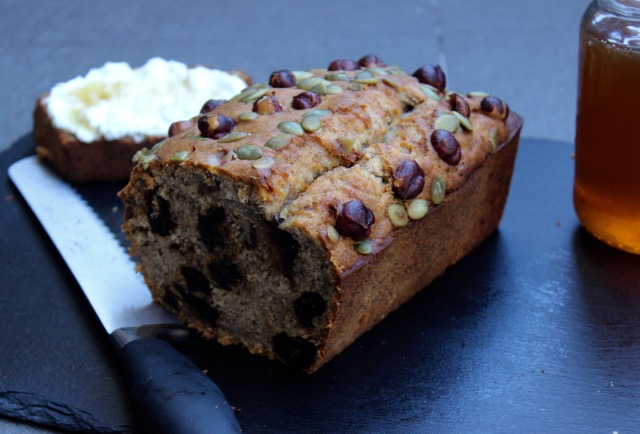
This Banana Hazelnut bread is sitting on my bench, in a red and white spotted tin. With an extra early start needed today, I traded my usual bowl of Quinoa Bircher Muesli with greek yoghurt and berries for a slice of this bread, toasted and spread with ricotta and honey.

And not just any Honey.

Honey from our good friends, who got them straight from their bees. And, oh my goodness, I am having to stop my family from eating the honey by the spoonful, straight from the jar.

The original recipe for this bread is from Louise Fulton-Keats, culinary legend Margaret Fulton’s granddaughter. I found it in The OzHarvest Cookbook, a book compiled of famous Australian foodie’s recipes, focusing on using leftovers at home and cooking simply.

I have played with this recipe to make it gluten free and refined sugar free for a loved one with a restricted diet. It came out moist and as delicious as ever, so I am including all options below to meet all dietary needs.

Banana Hazelnut Bread

Ingredients

  • 4 medium sized over-ripe bananas, mashed. You want 1 overflowing cup of mash.
  • 1/4 cup milk (soy, nut or coconut milk can also be used to make this dairy free)
  • 1/2 cup light olive oil or rice bran oil
  • 2 eggs
  • 3/4 cup pitted prunes, chopped (or dates if you prefer)
  • 1 1/2 cups wholemeal self raising flour (gluten free self raising flour also works well)
  • 1/2 cup hazelnut meal
  • 1/3 cup rice malt syrup (or 1/2 cup brown sugar if you prefer)
  • 1 teaspoon ground cinnamon
  • a handful of whole hazelnuts and pumpkin seeds to sprinkle on top

Method

  1. Preheat oven to 170 degrees celsius.
  2. Grease and line a loaf style tin.
  3. Mix all ingredients together in a large bowl, with a spoon, until all combined.
  4. Pour into tin and bake for about an hour, or until it's cooked when you insert it with a skewer and it comes out clean.
  5. If it's browning too quickly, loosely cover with a piece of foil for the remaining cooking time.
  6. Allow to cool in tin for a few minutes before you remove.
  7. Serve warm or toasted with ricotta and honey.
  8. This also freezes well, pre-sliced if you like for ease. It will last for 3 days in an air-tight container or a little longer in the fridge.

The Very Muddy Mud Cake

It was probably 1997 when I first came across this recipe, while I was studying in the library of my university.  I remember scrawling it on a piece of scrap paper… the only problem is, I didn’t take down the source.

Little did I know this would become the one and only mud cake I would bake from then on.

It was the cake I made for our engagement party, many years ago now. It looked so pretty, 2 tiered and decorated with crystallised pansies from my parents garden.

It has been many birthday cakes, a few wedding cakes and ‘just because’ cakes over the years since.

This cake, that rivals any mud cake you will buy, is made entirely in a saucepan, with a spoon and a whisk.

Anyone can make this cake, but I would stress two important things – don’t skimp on the 20ml of whisky or brandy. It really does bring a ‘depth of flavour’ that it needs. If you don’t have that at home, or can’t get your hands on a tiny bottle for cooking with, use 20ml of an espresso shot instead.

And the most important thing of all for a cake like this is please use GOOD quality dark chocolate. This is not a time for No Name
Compound Chocolate (I would actually argue there is never a time for compound chocolate, but that’s for a whole other blog post!)

Trust me, you can tell the difference.

So, keep your eye out for the next chocolate block sale, and pop some in the pantry to give this cake a go.

You’ll thank me later.

The Ganache recipe I use for this cake is a Donna Hay recipe, from her Chocolate cookbook.

IMG_7371


The Very Muddy Mud Cake

  • Prep Time: 25m
  • Cook Time: 45m
  • Total Time: 1h 10m

Ingredients

  • 250 grams unsalted butter
  • 250 grams good quality dark chocolate, chopped
  • 3/4 cup castor sugar
  • 20 milliliters brandy or whisky
  • 1 1/2 cups self-raising flour
  • 1/4 cup cocoa, sifted
  • 2 eggs, lightly beaten
  • 1 teaspoon vanilla extract
  • Chocolate Ganache
  • 1 1/2 cups pouring cream
  • 340 grams good quality dark chocolate

Method

  1. Melt butter over a medium heat in a medium sized saucepan.
  2. Add chopped chocolate, sugar, whisky and 1 1/2 cups water.
  3. Stir over low heat until the chocolate is melted and sugar has dissolved.
  4. Add flour and cocoa into warm chocolate mixture.
  5. Add eggs and vanilla, and using a hand balloon whisk, whisk until combined. It will be thick and glossy.
  6. Pour mixture into a greased and lined 20cm round cake tin.
  7. Bake at 150 degrees celsius for 45 minutes. The cake may crack slightly on top, that's okay. When you press lightly on the top the cake it should spring back a little and feel firm. You want it to be cooked but still have moist crumbs clinging to a cake tester. If you need to cook it a little longer, cover it with foil and keep checking every 5-10 minutes.
  8. Leave to cool in tin for 10 minutes then turn onto a wire rack to cool.
  9. When it's completely cold, either dust with icing sugar or top with a Chocolate Gananche.
  10. For the Chocolate Ganache, heat the cream in a saucepan over low to medium heat and bring to the boil.
  11. Remove from the heat and add the finely chopped chocolate.
  12. Leave to sit for a minute, then stir until the chocolate has melted and it's glossy and smooth.
  13. Set aside to cool at room temperature, where it will thicken and turn from a pourable consistency to a spreadable one. If you are pressed for time, you can put it in the fridge, but just check on it, as it will go hard if you leave it in the fridge too long.
  14. When it's the desired consistency, using a palette knife, spread the ganache evenly all over the cake.
  15. This cake freezes really well, and will also last for a week in an airtight container in the fridge. As with most chocolate cakes, it's best eaten at room temperature, or if it's a few days old, reheat each slice in the microwave slightly before serving.

Strawberry & Yoghurt Cake (egg free)

It’s a sign that your children are getting older, when they no longer request birthday cakes from the Women’s Weekly Birthday Cake cookbook, and instead choose a cake like this one.

My Soccer, V8, Formula 1, BMX, Rugby and Go-Kart loving son, who typically doesn’t like anything sweet and usually chooses chips over cake, requested this cake for his birthday this year.

The only way to describe this cake is simply lovely.

Originally a Neil Perry recipe, I have lowered the sugar a little, and found no difference with the way it cooked and tasted, and changed the way he serves it to suit my family.

For those not use to cooking with polenta, it gives a little ‘sandy’ texture to the cake, which adds to this cakes personality.

The cooked strawberries go a little ‘jammy’ and when eaten warm, you feel like you are eating a beautiful cake with pocketfuls of jammy goodness.

And to top it all off, it’s exceptionally simple to make. One bowl, a whisk and a spoon…..even my 4 year old helped to make this one.

Strawberry & Yoghurt Cake (egg free)

  • Prep Time: 20m
  • Cook Time: 1h
  • Total Time: 1h 20m

Ingredients

  • 200 grams polenta
  • 200 grams self-raising flour
  • 200 grams castor sugar
  • 1 teaspoon baking powder
  • 300 grams natural yoghurt
  • 110 grams butter, melted
  • 200 milliliters warm water
  • 300 grams strawberries, washed, hulled and chopped
  • extra strawberries kept whole to decorate
  • icing sugar to dust

Method

  1. Preheat oven to 170 degrees celsius.
  2. Grease and line with baking paper a 20cm springform tin.
  3. Place all the dry ingredients in a mixing bowl and whisk with a hand whisk to combine.
  4. Make a well in the centre, add yoghurt, butter and warm water and mix with a spoon until well combined.
  5. Stir through the strawberries gently.
  6. Bake for 1 hour or until a skewer inserted comes out clean. This may be different for different ovens. If not cooked after 1 hr, keep checking it every 15 minutes after.
  7. Leave to cool in tin on a cooling rack for 15 minutes, then remove from tin to cool completely.
  8. Dust with icing sugar and top with remaining strawberries to serve.
  9. This cake will keep for 2-3 days covered in the refrigerator.


Date & Walnut Muffins

Hey Friends,

I am trialling a new recipe format, that is hopefully easier for you to read and follow and also allows you to print the recipe out.

Let me know what you think.

Em x

These are the best low sugar, high fibre and protein muffins I have tasted in a long time!

The original recipe is from Curtis Stone’s cookbook Good Food Good Life. I swapped his plain flour for wholemeal spelt flour and added some extra dates for good measure.

These are nutty and moist and with the hint of orange and honey coming through, they should be a hit in your house too.

Date & Walnut Muffins

These low sugar, high protein Date and Walnut muffins are nutty and moist, with a hint of orange and honey.

  • Prep Time: 10m
  • Cook Time: 20m
  • Total Time: 30m
  • Yield: 12 muffins
  • Category:

Ingredients

  • 1 1/2 cups rolled oats
  • 1 cup plain wholemeal spelt flour
  • 2 teaspoons baking powder
  • 1/2 teaspoon bi-carb soda
  • 150 grams unsalted butter, softened
  • 1/4 cup brown sugar
  • 2 tablespoons honey
  • 3 teaspoons finely grated orange zest
  • 1/2 teaspoon cinnamon
  • 2 eggs
  • 2/3 cup plain greek or natural yoghurt
  • 1 1/2 cups walnuts, toasted and finely chopped
  • 16 dates, pitted and chopped

Method

  1. Preheat oven to 190 degrees C.
  2. Line muffin trays with cases.
  3. In a medium bowl, mix oats, flour, baking powder and bi-carb soda and whisk with a hand balloon whisk till combined.
  4. In the bowl of an electric mixer, cream butter, sugar, honey, orange zest and cinnamon until creamy.
  5. Beat in the eggs, one at a time.
  6. Beat in the yoghurt, then add the dry ingredients and beat gently until just combined.
  7. Using a spatula or spoon, gently stir in walnuts and dates.
  8. Divide the batter evenly among the cases and bake for 20 minutes or until golden and cooked when tested with a cake tester.
  9. These are best eaten warm and fresh, but will last for a couple of days in an airtight container. Alternatively, you can freeze them individually wrapped.

Lemon Polenta Cake (gluten free)

There are days when I want to wake early, do a 5km power walk, enjoy a healthy breakfast, drink loads of water and eat bowls of leafy greens for lunch and dinner.

And then there are days when I want to stay in my PJ’s, bake this Lemon Polenta Cake, invite a friend over and sit on the lounge watching the classic foodie movie ‘Julie and Julia.’

I keep trying to compile a list of my all time favourite cakes. The list changes from time to time as my tastes change, but always, always, always, a sticky, moist lemony cake of some kind is right near the top.

One of the things I love about this cake is that she is not at all fancy to look at – no-one is going to ooh and ahh when they see it sitting on the bench. But what it lacks in beauty, it more than makes up for in taste. I would choose a yummy cake over a good looking cake any day of the week.

This recipe is a Nigella Lawson classic. I love what she says about it – “If you wanted to imagine what lemon curd would taste like in cake form, then this would be it.”

I totally agree.

Ingredients

200gm unsalted butter, softened

200gm castor sugar

200gm almond meal

100gm polenta (cornmeal)

1 1/2 teaspoons baking powder

3 eggs

Zest of 2 lemons

Syrup

Juice of 2 lemons

125gm icing sugar

Method

Line the base of 23cm springform cake tin with baking paper, and lightly grease the sides of the tin with butter.

Preheat oven to 180 degrees celsius (160 degrees fan forced).

Beat the butter and sugar with electric beaters until pale and creamy.

Mix together the almond meal, polenta and baking powder and beat some of this into the butter mixture, followed by 1 egg, then alternate dry ingredients and eggs, beating continuously until it’s all combined.

Beat in the lemon zest.

Spoon the mixture into the prepared tin and bake in the oven for 40 minutes, or until golden on top and a cake tester comes out clean.

Leave in it’s tin to cool, but place the tin on a cooling rack.

To make the syrup, place the lemon juice and sugar in a small saucepan and bring to the boil over a medium heat. Boil until the sugar is dissolved and the syrup seems a little thicker.

Prick the cake all over with a cake tester and pour the syrup over the still warm cake.

Leave to cool in it’s tin.

This cake, if not eaten all at once, will last for 2-3 days in an airtight container in the fridge. Gently reheat pieces in a microwave  to freshen slightly.

IMG_6830